A-10A Introduction and Navigation
A-10A 導入 及び 航法
Welcome to your formal training in the A-10A Thunderbolt II. The 'Hog' is a robust and heavily armoured ground attack aircraft specializing in Close Air Support(CAS) missions supporting ground forces on the battlefield.
A-10AサンダーボルトIIの公式訓練にようこそ。この「イノシシ」は頑強で重武装の対地攻撃機であり、戦場で地上軍を支援するための近接航空支援ミッションに特化されています。
The A-10A is powered by twin tail mounted General Electric TF34-100 high by-pass turbofan engines each rated at 9065 lb. of thrust and is capable of reaching 390 kts at sea level with an 800 nautical mile range and a 45,000 foot ceiling.
A-10Aは、機体後部にGeneral Electric社製TF34-100高バイパス型ターボファンエンジンを2基搭載しています。出力は1基当たり9065ポンドで、海面高度での最高速390ノット、行動半径800海里、上昇限界45,000フィートの能力があります。
The A-10 is a big, ugly, mean machine but is a joy to fly! To take control of the aircraft at any time, press the 'CTRL-Q' keys. To exit this mission press the 'ESC' key and to pause at anytime to read the text press the 'S' key.
A-10は大きくて不細工でパッとしないマシンですが飛ばすのは楽しいです。「Ctrl Q」キーを押せば、いつでも操縦を引き継げます。ミッションを終了するには「ESC」キーを、一時停止してテキストを読むには「S」キーを押します。
Since you are already familiar with this aircraft after completing the UPT course I won't go into detail about the HUD but In this flight you will learn about the instrument panel, and how to navigate using the HUD and the instruments.
この機体に関しては、既にUPTコースを修了して馴染んでいるでしょうからHUDの詳細には触れませんが、このフライトで計器パネルに関してと、HUDと計器による航法を学んでもらいます。
We will start with the 5 basic flight instruments that are required to keep the aircraft in control when we can't see anything outside the canopy.
まずは5つの基本的な飛行計器から始めます。これらはキャノピーの外が見えない時に機体のコントロールを維持するのに必要となります。
The first is the ADI or Attitude Direction Indicator which is the primary instrument of the 5. It is an artificial horizon that displays the aircraft's pitch and bank angles.
1つ目はADI姿勢指示器で5つの内で一番重要な計器です。人工水平儀が機体のピッチとバンクの角度を表示します。
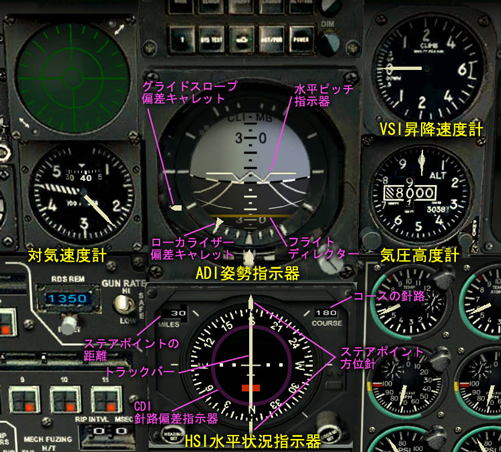
Pitch markings are graduated in 5 degree increments with the black half showing a descent and the grey half showing a climb. The bank markings are graduated in 10 degree increments to 30 degrees then one mark at 60 degrees.
ピッチの目盛りが5度毎に刻まれ、黒い部分が下降をグレーの部分が上昇を表します。バンク目盛りは30度までが10度毎にそれ以上は60度の所に刻まれています。
Integrated into the ADI is a flight director which will tell you whether to climb, descend, or turn in order to use the Instrument Landing System(ILS) at each airport. The flight director on the ADI is a very precise instrument that will help keep you on the localizer and glideslope.
ADIにはフライトディレクターが組み込まれていて、各飛行場でILS計器着陸装置を使う場合に上昇、下降、旋回など機体操作の指示を得ることができます。ADI上のフライトディレクターは非常に精密な計器であり機体がローカライザーとグライドスロープから外れないようにしてくれます。
The white tic mark on the left side of the ADI is the glideslope deviation caret displaying vertical guidance for the ILS.
ADIの左側の白い針がグライドスロープ偏差キャレットでILSの縦方向のガイドとなります。
The white tic mark on the bottom is the localizer deviation caret displaying lateral guidance for the ILS.
下側の白い針はローカライザー偏差キャレットでILSの横方向のガイドとなります。
The horizon pitch indicator will show us our pitch attitude and the flight director cross in the center of the ADI gives us the direction to maneuver the aircraft to keep it on the ILS. If you keep both bars crossed at the center, and the to white tick marks centered you will be precisely on the localizer and glideslope.
水平ピッチ指示器は機体のピッチ姿勢を示し、ADIの中で交差するフライトディレクターがILSに従って機体を操作する方向を示します。中央で両方のバーが交差し2つのキャレットの白い針が中央になるようにすれば、機体は正確にローカライザーとグライドスロープに乗っています。
Next is the HSI or Horizontal Situation Indicator which shows a horizontal, top-down view of the aircraft superimposed on a compass. The compass rotates so that the aircraft heading always appears at the top of the display.
次はHSI水平状況指示器で真上から見た水平な機体の状況がコンパス(羅針儀)に重ねて示されます。コンパスの方が回転して機首の方位が常に計器の真上側になるようになっています
The steerpoint bearing needle is the white needle and tail on the outer edge of the compass ring and points to the selected steerpoint.
ステアポイント方位針は、コンパスの一番外側のリング上の白い針と尾部で、選択中のステアポイントの方向を指します。
The digital number on the upper left shows the distance to the steerpoint while the digital readout on the upper right shows the required course to the steerpoint.
左上の数値表示はステアポイントまでの距離で、右上の数値表示はコースの針路を表します。(訳注:この針路は、通過したステアポイントから次のステアポイントへの方位です。機体から見たステアポイントの方位ではありません。)
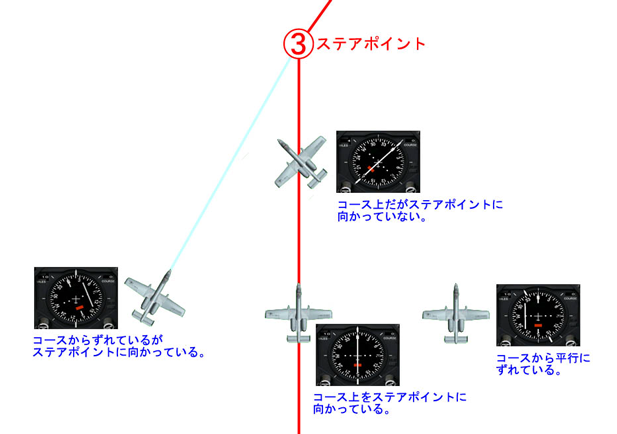
The CDI/track bar or course deviation indicator in the center of the HSI illustrates the intended course relative to the aircraft in the center of the instrument. When the track bar is centered and pointing up, you are on course.
HSIの中央はCDI針路偏差指示器とそのトラックバーで、真ん中を機体として、それに対する目的のコースの位置を表します。トラックバーが真ん中になって真上を指していれば、コースに乗っていることになります。
Now we move to the airspeed indicator, located just below the Radar Warning Receiver(RWR) scope, the airspeed Indicator shows indicated airspeed(IAS) from 50 to 500 knots.
今度は対気速度計です。レーダー警戒受信機(RWR)スコープの真下にあり、50〜500ノットまで指示対気速度を表示します。
Next is the barometric altimeter which displays the aircraft's altitude above mean sea level at all times with a digital window and a sweeping pointer. The altimeter scale reads in 20 foot increments and each whole number represents 100 feet.
次は気圧高度計で、常に標準海面に対する機体高度(海抜高度)を数値窓と回転する針で表示します。高度計の目盛りは20フィート刻みで、数値の方は100フィートごとに変化します。
The last of the 5 is the VSI or Vertical Speed Indicator which indicates the aircraft's rate of climb or decent in thousands of feet per minute. The needle counts clockwise from zero as the aircraft climbs, and counts counter-clockwise as the aircraft descends.
最後5つ目はVSI昇降速度計で、機体の上昇と下降の割合(昇降率)を毎分1000フィートの単位で示します。ゼロから時計回りが上昇を、反時計回りが下降を表します。
Ok, time to learn how to navigate using the HUD, ADI, and HSI. First, let's learn about the navigation information on the HUD.
では、HUDやADI、HSIを使って航法を行なう方法を学びましょう。最初にHUD上の航法情報を学びます。
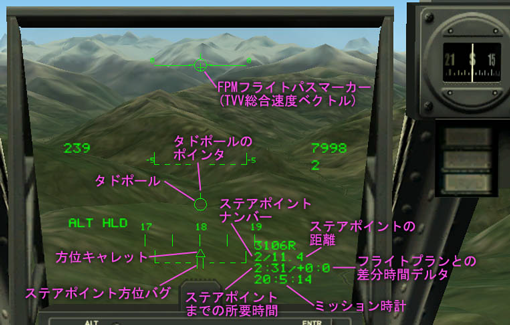
On the HUD we have 2 NAV symbols, the 'Tadpole' and the steerpoint heading bug. The tadpole will help guide us to the selected steerpoint by moving side to side on the HUD as well as pointing in the direction of the selected steerpoint.
HUD上には2つの航法用シンボルマークがあります。タドポールとステアポイント方位バグです。タドポールはHUD内を左右に動き、同時にタドポールのポインタがステアポイントの方向を向くことで、現在のステアポイントへ機体を導いてくれます。
For example, if we are left of the steerpoint, the tadpole will be offset to the right of the HUD and its pointer pointing to the right. If the steerpoint is directly ahead of us the tadpole will be centered over the FPM on the HUD and it will point up to it.
例えば、機体がステアポイントに対し左を向いていれば、タドポールはHUDの右側にずれ、そのポインタは右を指します。ステアポイントが真正面の場合は、タドポールは真ん中でFPM(フライトパスマーカー)と並び、ポインタはFPMに向かって上を指します。
The steerpoint heading bug is the small '| |' symbol under the heading tape and when aligned with the heading caret you are heading towards the selected steerpoint.
ステアポイント方位バグは方位テープの下の小さな「| |」マークで、方位キャレットと並んでいればステアポイントに向かって飛行していることになります。
On the lower right of the HUD is the Navigation block. This block provides all the steerpoint information while in NAV mode.
HUDの右下には航法ブロックがあります。NAVモードでは、このブロックが全てのステアポイント情報を提供します。
The navigation information is displayed on 3 lines, the first line showing the currently selected steerpoint and current distance remaining to the steerpoint.
航法情報は3列に表示されます。1列目が現在選択中のステアポイントと、そこまでの残りの距離を示します。
The second line shows the actual time remaining to reach the steerpoint and the DELTA or difference in time to reach it as compared to the pre-planned time over the steerpoint. This time will change as your speed differs from the pre-planned speed in the mission editor.
2列目はステアポイントに到着するまでの実際の所要時間と、到達時間をフライトプラン上の時間と比較した差分「デルタ」を表示します。この時間はミッションエディタで事前にプランをした速度と実際の速度の違いによって変化します。
The third line shows a mission clock indicating real time for the mission. We can cycle through the steerpoints by pressing the '~' TILDE key.
3列目はミッション時計でミッションの実進行時間を示します。ステアポイントは「~」キーで切り替えられます。(訳注:「~」キーは日本語キーボードでは入力できません。ゲーム内オプションのINPUT設定で、「FLIGHT」の「Select next waypoint or airfield」を変更すれば入力可能になります。)
Now that we've learned about the displays and instruments required for navigation in the A-10, it's time to put this knowledge to work. We are currently heading for steerpoint 2 level at 8000 feet and as we approach it the computer will automatically select the next steerpoint.
A-10での航法に必要な表示と計器について学んだので、その知識を実際に使ってみましょう。現在機体は高度8000フィートを水平飛行でステアポイント2に向かっています。ステアポイントに接近するとコンピュータが自動的に次のステアポイントを選択します。
What an incredible evening to be flying in the spectacular Caucasus Mountains!!
雄大なコーカサス山脈を飛行するには最高の午後ですね!!
This might seem like tedious training but after we are finished, you will realize just how valuable and life saving it is and there is no better way to experience the scenery of this area.
この訓練は退屈なものに思えるかもしれませんが、終わった時には、この訓練がいかに大切で命に関わるものであるかを実感するでしょう。それをこういう風景の中で体験できるのは願ってもないことです。
There is the switch to steerpoint 3 and now notice that the NAV block information has changed, the tadpole is on the left side pointing to 10 o'clock, the heading bug is to the left, and the HSI CDI is offset to the left and indicating a course of '127' and the steerpoint bearing needle is pointing to the left.
ステアポイント3に切り替わって、航法ブロックの情報が変化したのが分かります。タドポールが左側になり10時の方向を指し、方位バグが左にずれ、HSI上のCDIのトラックバーが左にずれ針路「127」を示し、ステアポイント方位針が左を向いています。
I'll turn start a climbing left turn now. To get to steerpoint 2 on the proper course and altitude we'll have to intercept the course using the CDI and climb.
左旋回上昇を始めます。ステアポイント3に正しいコースと高度で到達するためにCDIを用い上昇しながらコースに合流します。
I'll intercept the course at a 30 degree angle so we will fly a heading of '097', now notice the tadpole pointer moving right along the HUD and pointing to the right.
30度の角度でコースに交差し合流するよう方位「097」で飛行します。タドポールがHUDの右に移動し右を指しています。
Once we intercept the course and turn towards the steerpoint we'll be on track with the CDI centered, the bearing needle pointing up, the heading bug centered, and the tadpole centered and pointing up.
コースに交差したのでステアポイントに向かって旋回すると、CDIのトラックバーが中央になり、方位針が真上を指し、方位バグが中央になり、タドポールも中央で真上を指しています。
Now we'll continue the climb to 14,000 feet.
14,000フィートまで上昇を続けます。
We are now level at 14,000 feet enroute to steerpoint 3.
14,000フィートで水平飛行に移りステアポイント3に向かっています。
To the left is Gora El'Brus, at 18,510 feet or 5,642 meters,, it's the highest mountain in the Caucasus Range and the highest peak in all of Europe. What an magnificent sight!
左に見えているのは標高18,510フィート(5,642メートル)のGora El'Brus山で、コーカサス域で一番高い山であり同時に全ヨーロッパの最高峰でもあります。凄い眺めですね!
Now we are 8 miles from steerpoint 3. Let's select steerpoint 4 early and intercept the course by pressing the '~' TILDE key. I'm in the turn.
ステアポイント3まで8マイルです。「~」キーを押して早目にステアポイント4を選びコースに合流しましょう。旋回しています。
Steerpoint 4 is now selected and to our right. The bearing needle and CDI are pointing to the right and the CDI is displaced to the left indicating a course of '256', also note the tadpole and heading bug are to the right.
選ばれたステアポイント4は機体の右方向になります。方位針とCDIの向きは右を向いています。CDIのトラックバーは左にずれていて針路「256」を指しています。またタドポールと方位バグも右にずれています。
I'll intercept at a 30 degree angle and since the bearing needle head is to the left of the course head, I'll take the course and subtract 30 to it to get a heading of '226'. I'll turn to it now and start descending to 13,000 feet.
30度の角度でコースに交差し合流します。方位針はコース方位の左を向いていますから、30を差し引いて方位「226」とします。この方位へ旋回し13,000フィートへの下降を始めます。
We are now level at 13,000 feet on course to steerpoint 4.
高度13,000フィートの水平飛行でステアポイント4へのコースに乗っています。
Now I'll select steerpoint 5 and there is the new course of 214. The bearing needle and CDI are pointing to the left and the CDI is displaced to the right indicating a course of '214', I'll intercept the course at a 45 degree angle this time so I'll add 45 to 214 and turn to an intercept heading of '259' and start the descent to 9,000 feet.
ここでステアポイント5を選ぶと針路が214となります。方位針とCDIは左を指しCDIは針路「214」を示しトラックバーは右にずれています。45度の角度でコースに交差し合流するために、214に45を加えた方位「259」へ旋回し、9,000フィートへ下降します。
Track bar is alive. I'll remain on this heading until the track bar is almost centered, then turn to left intercept the track.
トラックバーが動いています。この方位を保ち、トラックバーがほぼ中央に来たら左に旋回してコースと合流します。
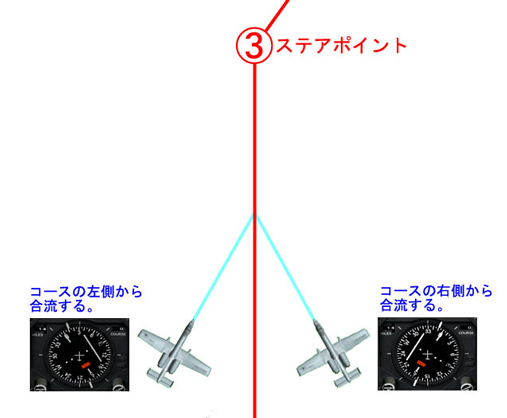
Always remember that the CDI will be displaced to the side that the flight planned course is on and your intercept heading should always be to that side so always take the intercept heading off of that side of the HSI compass.
CDIのトラックバーはフライトプランのコースがある方向にずれますから、合流するための方位もその方向にずらします。つまりHISコンパス上でその方向にずらした方位が合流の方向です。(訳注:ステアポイントの方位よりもトラックバーのずれた方向に飛行すればコースに合流できる、という意味です。)
As you can see, it is critical to be able to navigate properly, especially while flying in mountainous areas, which is why this training is so important. Being off course by only a few degrees or missing required altitudes can result in catastrophic consequences. Imagine if we were in cloud the entire time while on this training flight. One wrong turn or error in tracking would be deadly.
このように正しく航法を行なえることは特に山間部を飛行するときに重要で、この訓練が大切な理由でもあります。たった数度コースを外れたり必要な高度を間違えただけで悲劇的な結果につながる場合もあります。この訓練飛行がずっと雲の中だった場合を想像してみてください。旋回や経路をひとつ間違えれば死につながります。
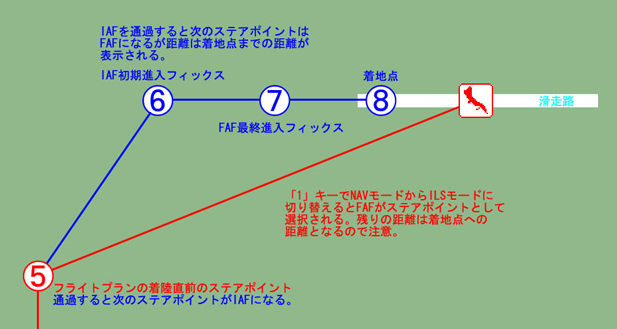
Once we reach steerpoint 5 the NAV computer will automatically switch to the 'Return' mode to direct us to the 'IAF' or Initial Approach Fix.
ステアポイント5に到達すると航法コンピュータが自動的に「帰還」モードに切り替わり「IAF」初期進入フィックスへ誘導されるはずです。
There is the switch to the IAF so I'll turn to a course of 219 and start descending to 1500 feet and slowing to 300 knots.
IAFへの切り替え地点で、針路219に旋回し、高度1500フィートへ下降、300ノットに減速します。
The Caucasus mountains sure drop off sharply to the coast here in the southeast.
コーカサス山脈は、ここ南東部で海岸部に向けて急激に標高が下がります。
Now we're level at 1500 feet 6 miles from the IAF. The airport is at our 2 o'clock. When we reach the IAF, the NAV computer will switch to the ILS mode to line us up for the runway and guide us down the glideslope.
IAFまで6マイルの地点で高度1500フィートの水平飛行になっています。飛行場は2時の方向です。IAFに到達すると、航法コンピュータがILSモードに切り替わり、機体を飛行場に正対させグライドスロープを下降するよう誘導されるはずです。
I will begin to slow to 250 knots now as we enter the terminal airspace of Sukhumi airbase.
Sukhumi飛行場のターミナル空域へ進入するので、250ノットになるまで減速します。
We are now 5 miles from the IAF so I'll select approach flaps with the 'F' key and start to slow to 170 knots.
IAFから5マイル地点で「F」キーを押してアプローチ用フラップ(ハーフフラップ)を選び170ノットへ減速を始めます。
There is the switch. I'll turn right to line up the needles on the HSI so we are on the runway heading.
ILSへ切り替わりました。HSIの針が中央になるように右に旋回し、滑走路へ向かう方位にします。
Looking at the HUD now, we can see the ILS localizer and glideslope guidance bars. I'll remain level until the glideslope starts sliding down to the center where I'll begin a descent of about 900 feet per minute.
HUDを見ると、ILSのローカライザーとグライドスロープの誘導バーが見えます。グライドスロープが中央に移動してくるまで水平飛行を続け、その後毎分900フィートの下降に移ることになります。
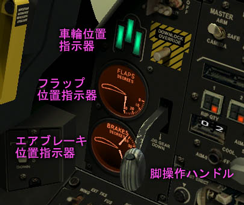
The glideslope bar is almost to the center so I'll extend the landing gear with the 'G' key and turn on the landing lights by pressing the 'ALT-L' keys 2 times.
グライドスロープバーがほぼ中央に来たところで「G」キーを押して車輪を出し「Alt L」を2回押して着陸灯を点けます。
There is glideslope intercept, time to start descending and slowing to 170 kts.
グライドスロープに交差したので、下降を始め170ノットに減速します。
There is the Final Approach Fix or FAF, I'll select landing flaps with the 'SHIFT-F' keys and confirm 3 green.
FAF最終進入フィックスに到達します。「Shift F」で着陸用フラップ(フルフラップ)を選び、3つのグリーンライト(車輪位置指示器)を確認します。
Now, its a matter of maintaining a stabilized approach to the runway. I have the thrust set at about 85% N1 which should be good for the final approach speed of 150-160 kts.
あとは滑走路への安定したアプローチを維持すれば良いだけです。約85パーセントの推力N1にセットしたので、速度150〜160ノットの最終アプローチに適した値のはずです。
Touchdown! Airbrakes out with the 'B' key and wheel brakes with the 'W' key.
タッチダウン(着地)!「B」キーがエアブレーキ、「W」キーが車輪のブレーキです。(訳注:「W」キーは押している間だけ働きます。)
A fast and easy method to navigate to a steerpoint is to simply turn the aircraft to a heading where the bearing needle and the tadpole are pointing straight up and the heading bug is centered on the heading caret, then fly to it. You won't be on the flight planned course but you'll get there faster.
ステアポイントへ機体を誘導するお手軽な方法は、方位針とタドポールが真上を指し方位バグが中央で方位キャレットと並ぶような方向に機体を旋回させ、その方向に飛行することです。フライトプランのコースからは外れるかもしれませんが、ステアポイントには早く到達します。
This concludes the navigation and ILS training mission. To fully understand the navigation instruments, please read the manual. Using the HUD and your navigation instruments will help keep you on course and at the proper altitudes while carrying out exciting missions in the A-10A. Press the 'ESC' to exit.
これで航法とILSの訓練ミッションを終了します。航法用計器を完全に理解するにはレファレンスマニュアルを読んでください。HUDと航法用計器を使えば、A-10Aでエキサイティングなミッションをこなしている間もコースからずれない正しい高度の飛行が可能です。「ESC」キーで終了してください。(訳注:実際にはA-10ではフライトプランの高度情報は表示されません。高度を守るにはフライト前にメモなどを取る必要があります。また、まれにタドポールや方位バグの位置がおかしくなる場合があるようです。そんな時でもHSIの表示は正しいので、念のため確認する習慣を付けると良いと思います。)
<以上>