A-10A:導入と航法、ILSアプローチ
Hello and welcome to your formal training in the A-10A Thunderbolt II. The 'Hog' is a robust heavily armored ground attack aircraft specializing in Close Air Support (CAS) missions supporting ground forces on the battlefield.
A-10AサンダーボルトII の公式訓練にようこそ。この「イノシシ」は頑強で重装甲の対地攻撃機であり、戦場で地上軍を支援するためのCAS近接航空支援ミッションに特化されています。
The A-10A is powered by twin tail mounted General Electric TF34-100 high by-pass turbofan engines each rated at 9065 lb. of thrust. This aircraft is capable of reaching speeds of 390 knots at sea level, has an 800 nautical mile range and a 45,000 foot ceiling.
A-10Aは、機体後部にジェネラルエレクトリック社製TF34-100高バイパス型ターボファンエンジンを2基搭載しています。推力は1基当たり9065ポンドで、海面高度での最高速390ノット、行動半径800マイル(海里)、上昇限度45,000フィートの能力があります。
In the course of this evening's flight you will learn about the five basic flight instruments on the A-10's instrument panel and how to use them in conjunction with the HUD to navigate and land.
この午後の飛行中に学ぶのは、A-10の計器盤にある5つの基本飛行計器についてと、それらをHUDと合わせて使用し航法と着陸を行う方法です。
Before we begin, two additional notes:
First, you can pause the mission at any time with the 'S' key. That will be especially helpful, if you are trying to read the text.
Second, to take control of the aircraft at any time, press the 'CTRL-Q' keys. To exit this mission completely, press the 'ESC' key.
始める前にもう二点。
第一に、一時停止してテキストを読むには「S」キーを押します。テキストを読む場合に便利でしょう。
第二に、「Ctrl Q」キーを押せば、いつでも操縦を引き継げます。ミッションを終了するには「ESC」キーを押します。
Thank you. I have control.
では、私が操縦します。
While we're still on the ground, let's talk about the 5 basic flight instruments. With them, you can keep the aircraft in control when you can see nothing beyond the canopy.
地上にいる内に、5つの基本飛行計器について話しておきましょう。これらを使えばキャノピーの外が全く見えなくても機体をコントロールできます。
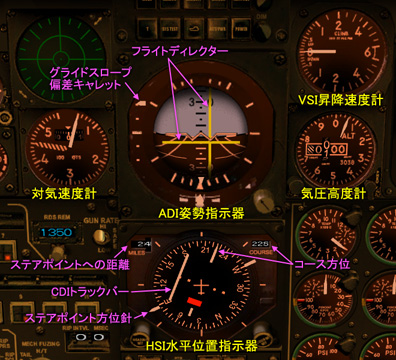
The first is the ADI or Attitude Direction Indicator. This is the primary instrument of the five and it provides a wealth of information. Let's take a closer look.
最初はADI姿勢指示器です。5つの基本計器の内で一番重要なもので、多くの情報を提供してくれます。詳しく見ていきましょう。
First, it is an artificial horizon that displays the aircraft's pitch and bank angles.
まず、これは人工水平儀で機体のピッチとバンク角を示します。
Pitch markings are given in 5 degree increments. The black half indicates descent. The grey half indicates climb. The bank markings are given in 10 degree increments up to 30 degrees. Then there are two additional marks: one at 60 and another at 90 degrees.
ピッチ目盛りは5度刻みです。黒い部分が降下を、灰色の部分が上昇を表します。バンク目盛りは30度までが10度刻みで、60度と90度の2ヶ所にも目盛りがあります。
Second, integrated into the ADI is a flight director which will tell you whether to climb, descend, or turn right or left when using the ILS or Instrument Landing System at each airbase. The ADI flight director is very precise and will keep you on the localizer and glide slope.
次は、ADI に組み込まれたフライトディレクターで、各飛行場でILS計器着陸装置を使う場合に上昇や降下、左右の旋回などの指示を得ることができます。このADI上のフライトディレクターは非常に精密で、機体がローカライザーとグライドスロープから外れないようにしてくれます。
Even without the HUD, the ADI flight director will guide you down safely. The white tick mark on the left side, is the glideslope deviation caret for the ILS. This tells you whether you are above, below, or centered on the proper altitude for a safe landing.
HUDがなくてもADIのフライトディレクターがあれば安全に着陸できます。左側の白い針がILS用のグライドスロープ偏差キャレットです。これは、安全な着陸のための適切な高度に対して機体が上なのか下なのか、それとも合っているのかを示します。
Use the vertical yellow bar to keep you centered on the localizer. It'll tell you whether you are to the right, left, or centered on the runway.
ローカライザーの中央に機体を合わせるには、縦の黄色いバーを使います。これは滑走路に対して右なのか左なのか、それとも中央なのかを示します。
When landing using the ILS, the horizon pitch indicator will show you your pitch attitude and the flight director cross, in the center of the ADI, tells you where to maneuver the aircraft to keep it on the ILS. If you keep both of the bars and the white tick marks centered, you will be precisely on the localizer and glideslope.
ILSを使って着陸する場合、水平ピッチ指示器は機体のピッチ姿勢を示し、ADIの中で交差するフライトディレクターはILSに合わせて機体を操作する方向を示します。中央で両方のバーが交差しキャレットの白い針が中央になるようにすれば、機体は正確にローカライザーとグライドスロープに一致しています。
Below the ADI, is the HSI or Horizontal Situation Indicator. This instrument gives you a top-down view of the aircraft superimposed on a compass ring. The compass ring rotates so that the aircraft heading is always at the top of the display.
ADIの下はHSI水平位置指示器です。これは真上から見た機体の状況がコンパス(羅針儀)に重ねて示されます。コンパスの方が回転して機首の方位が常に計器の真上側になるようになっています
The steerpoint bearing needle is the white pointer and tail on the outer edge of the compass ring. It always points toward the selected steerpoint. The digital number in the upper left corner indicates the distance to the steerpoint. The number in the upper right corner is the required course to the steerpoint.
ステアポイント方位針は、コンパスの一番外側のリング上の白い針と尾部で、選択しているステアポイント(ウェイポイント)の方向を指します。左上の数値表示はステアポイントまでの距離を示します。右上の数値表示はステアポイントへの指定コースの向きを表します。(訳注:ここでの「コース」とは通過したステアポイントと次のステアポイントを結ぶ直線航路です。)
Located in the center of the HSI is the CDI track bar or Course Deviation Indicator. It is composed of two parts. Let me select another steerpoint so you can see this more clearly. By the way, you cycle steerpoints with the 'TILDE' (~) key.
HSIの中央はCDIトラックバーつまり航路偏差指示器です。これは2つの部分から成ります。別のステアポイントを選んではっきり分かるようにしましょう。ところで、ステアポイントは「~」キーで切り替えられます。(訳注:「~」キーは日本語キーボードでは入力できません。)
The outer portion of the track bar always points to the heading you need to fly to get from Steerpoint A to Steerpoint B. The inner moving portion, on the other hand, indicates how far off the courseline you are and to which side of that courseline you need to point your aircraft to pick the correct track up again.
トラックバーの外側の部分は常にステアポイントAからステアポイントBへ飛行する方位を指します。一方、内側の動く部分は機体がそのコースからどのぐらい離れているかを示し、コースに合流にするにはコースラインのどちら側に機体を向ければ良いかを示します。
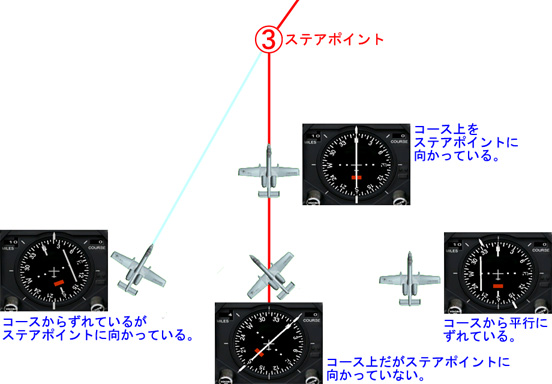
When the track bar is centered and the steerpoint bearing needle is pointing straight up, you are precisely on the planned courseline.
トラックバーが真ん中になってステアポイント方位針が真上を指していれば、計画したコースに正確に乗っていることになります。
Of course, you can always 'bushwack' from steerpoint to steerpoint simply using the bearing needle. Such an approach is fine, if there is no requirement to fly a precise flight path. But should there be low visibility or enemy activity, not flying the assigned flight path can lead to all kinds of problems.
もちろん、いつでも方位針を使ってステアポイントからステアポイントへ「突っ切る」事はできます。正確な飛行航路を飛ぶ必要がなければ、そういうやり方も結構です。しかし視界が悪い場合や敵の活動がある場合は、指定された飛行航路から外れる事は様々な問題を生じさせかねません。
Okay. Let's bring this beast to life. And while I'm doing that, we'll talk about the final 3 of the 5 instruments.
よろしい。この野獣に息を吹き込みましょう。そしてその作業の間に、5つの主要計器の残り3つについて話しましょう。
Located just below the RWR scope and to the left of the ADI, is the airspeed indicator. This instrument shows indicated airspeed (IAS) from 50 to 550 knots.
RWRスコープの下、ADIの左は対気速度計です。この計器はIAS指示対気速度を50から550ノットまで示します。
To the right side of the ADI is the barometric altimeter. This instrument display's your altitude above mean sea level-- not above the land --with a digital window and a sweeping pointer. The altimeter scale reads in 20 foot increments and each whole number represents 100 feet.
ADIの右側は気圧高度計です。この計器は常に海抜高度(対地高度ではない)を数値窓と回転する針で表示します。高度計の目盛りは20フィート刻みで、数字は100フィート毎に書かれています。
The last of the group of 5 is the VSI or Vertical Speed Indicator. This indicates your rate of climb or descent in thousands of feet per minute. The needle counts clockwise when you're climbing and counterclockwise when you're descending. Ummm... don't confuse them.
最後5つ目はVSI昇降速度計です。これは機体の上昇または降下の割合(昇降率)を毎分1000フィートの単位で示します。針は時計回りで上昇を、反時計回りで降下を表します。勘違いしないようにして下さい。
Okay. We're about ready to go.
よろしい。もうすぐ準備完了です。
Setting flaps to takeoff position.
Engines are spooled up. Everything looks good.
フラップを離陸位置にします。(ハーフフラップ)
エンジンの回転数は上がりました。全て正常です。
Tower. Dodge 1-1. Permission to taxi.
管制塔へ、ドッジ1-1、地上走行許可を求めます。
Dodge 1-1. Taxiing.
ドッジ1-1、地上走行します。
All clear.
障害無し。
Okay. You've learned a bit about navigating with the ADI and HSI. Next let's consider the HUD.
よろしい。ADIとHSIを使った航法に関して少し学んだので、次はHUDに注目しましょう。
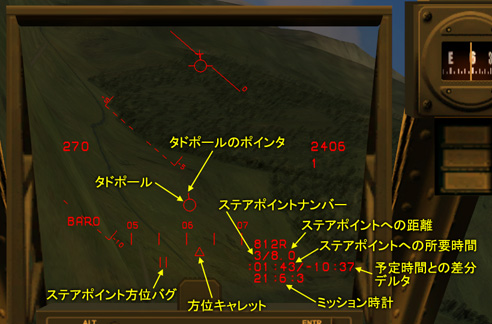
On the HUD, we have two navigation symbols. These are the 'Tadpole' and the 'Steerpoint Heading Bug'. The tadpole will help guide you to the selected steerpoint by both moving from side to side on the HUD and pointing it's pointer in the direction of the selected steerpoint.
HUD上には2つの航法シンボルが見えます。「タドポール」と「ステアポイント方位バグ」です。タドポールはHUD内を左右に動き、かつそのポインタがステアポイントの方向を向くことで、選んだステアポイントへ機体を導いてくれます。
Here, for example, we are to the right of the steerpoint. The tadpole is offset to the left and pointing to the left. But, if we were to the left of the steerpoint, the tadpole would be offset to the right and pointing to the right.
ご覧なさい。例えば、機体がステアポイントの右側を向いているとします。タドポールは左側にずれ左側を指します。逆に機体がステアポイントの左側を向いていると、タドポールは右側にずれ右側を指します。(訳注:タドポールと方位バグにはバグがあって左右が逆になる場合があります。)
When it's centered and pointing straight up, the steerpoint is directly ahead.
中央にあって真上を向いていれば、ステアポイントは真っ直ぐ正面です。
The 'steerpoint heading bug' is the small '||' under the heading tape. When it's aligned with the heading caret, you are heading for the selected steerpoint. Unlike the HSI's CDI, however, the neither of these HUD cues will tell you if you are following the required course.
「ステアポイント方位バグ」は方位テープの下の小さな「||」マークです。これが方位キャレットと一致していれば、機体は選択したステアポイントに向かっています。しかしHSIのCDIと違って、どちらのHUDシンボルも指定コースに従っているかどうかは示しません。
They only tell you that you're aimed at the steerpoint. You could be off the courseline by miles and, as long as there are no intervening mountains or SAMs lurking in the terrain you overfly, you will reach the steerpoint.
これらはステアポイントに向かっている事を示すだけです。機体はコースから何マイルもずれている可能性もありますが、途中に邪魔をする山脈や通過する地帯に隠れて待ち伏せするSAMがなければ、ステアポイントに到着します。
On the lower right of the HUD is the 'Navigation Block'. This three line block provides all the steerpoint information you need while in NAV mode.
HUDの右下は「航法ブロック」です。NAVモードでは、この3行のブロックが必要な全てのステアポイント情報を提供します。
The first line displays the currently selected steerpoint number and distance remaining to reach it. Right now the first steerpoint is selected and we are 10.5 nautical miles from it.
1行目は現在選択しているステアポイントナンバーと残りの距離を示します。現在1番目のステアポイントが選択され10.5マイルの距離です。
The second line shows the actual time remaining to reach the steerpoint and the DELTA or difference between the pre-planned time and actual time you will get there.
2行目はステアポイントに到着するまでの実際の所要時間と、事前計画した時間と実際の到達時間を比較した差分「デルタ」を表示します。
If the DELTA is negative, you need to speed up in order to reach the steerpoint at the assigned time. If positive, slow down.
デルタがマイナスの場合、予定時間にステアポイントに到着するには加速しなければなりません。プラスなら減速します。
We'll ignore the DELTA for this flight, however, since we're not trying to meet a scheduled time-over-target.
ですが、今回の飛行では予定した目標到達時間に合わせる訳ではないので、デルタを無視します。
The third and final line is the mission clock indicating real time. It's now 20:58:28.
一番下3行目はミッション時計で現在時刻を示します。現在20時58分28秒です。
And it looks like a fine evening to fly.
飛行に適した天気の良い夕べです。
This is a lot to digest, I know, but you'll be seeing it all again in the air in a minute or two.
覚える事が多いですね。大丈夫、数分後地上を離れてから全て復習します。
Let's check the pattern for traffic.
Everything looks clear.
経路上にトラフィックがないか確認します。
全て問題ありません。
Gauges are still looking good.
Let's doublecheck. Steerpoint one is selected in the NAV computer.
計器は今も正常です。
再確認しましょう。航法コンピュータではステアポイント1が選ばれています。
We'll stop short of the runway and take one last look for traffic in the pattern.
滑走路の少し手前で停止し経路上のトラフィックを最終確認します。
All clear. Let's take the runway.
障害無し。滑走路に入ります。
Tower Dodge 1-1. Permission to take off.
管制塔へ、ドッジ1-1、離陸許可を求めます。
Throttles to 100%.
Gauges good.
推力100%。
計器正常。
Dodge 1-1. Rolling.
ドッジ1-1、滑走開始。
150 knots. Rotate.
150ノット。機首上げ。
Positive rate of climb. Gear coming up.
昇降率プラス。車輪上げ。
Gear up and locked.
車輪格納完了。
Notice the CDI track bar moving away from the course line on the HSI. And the steerpoint bearing needle is indicating that the waypoint is well off to our right.
CDIトラックバーがHSIのコースラインから離れていくのが分かりますね。そしてステアポイント方位針はウェイポイントが右へ大きくずれている事を示しています。
The tadpole is pointing to the right, as well.
タドポールも同じく右を差しています。
We'll turn and intercept the course line running from Sukhumi to Steerpoint 1. The most common intercept angles are 45 and 30 degrees. Since we won't be far off course, we'll use the shallower 30 degree intercept.
Sukhumi飛行場からステアポイント1に向かうコースに合流するよう旋回します。最も一般的な合流角度は45度と30度です。機体はコースからそれほど離れていないので、より緩やかな30度の合流を用います。
So let's calculate the intercept course. The required course for Steerpoint 1 is 19. The trackbar is to THIS side of the steerpoint needle.
では合流コースを計算しましょう。ステアポイント1への指定コースは19です。トラックバーはステアポイント針の「こちら」側にずれています。
As you move from the needle's head to its tail the degrees get bigger. So, trust me on this, you add the 30 degrees to 19. Our intercept heading is 49.
こちら側だと、針の先から尾部へ回る時に角度が大きくなります。ですから、信じて欲しいのですが、19に30度を加えます。機体の合流方位は49です。
The tadpole is still pointing a bit to the left telling us that's the direction to the steerpoint. Our heading is now 49. Hold it there.
タドポールはまだ少し左を指し、そちらがステアポイントの方向である事を示しています。機体の方位は49になりました。このままの状態を保ちます。
The track bar is alive and slowly moving down. Shortly before it aligns, begin a slow turn toward the steerpoint.
トラックバーが動き出しゆっくりと下りて来ています。一致する少し前に、ステアポイントに向かってゆっくりと旋回を始めます。
Here we go.
ここで始めます。
Ease off on the turn. And come out fairly well aligned.
滑らかに旋回を終えます。そして非常にうまく合わせられました。
Not bad. The tadpole, heading caret and heading bug are aligned with the tadpole pointing straight ahead. But the HSI is indicating that we are slightly to the left of the actual course and need to steer right just a bit to be precise.
大変よろしい。タドポールと方位キャレット、方位バグは一緒に並び、タドポールは真上を指しています。しかし、HSIは機体が実際のコースより少し左にずれている事を示しているので、正確を期すために少しだけ右に舵を取ります。
There it is. Course 19 degrees. The tadpole is HUD center and pointing straight up. The heading caret and heading bug are aligned beneath it. And, on the HSI, a solid needle pointing straight up.
合いました。コースは19度。タドポールはHUD中央で真上を指しています。その下で方位キャレットと方位バグが一致しています。そして、HSIでは一本になった針が真上を指しています。
Look at the NAV block. Steerpoint 1 is selected and 2.3 nautical miles away. We will reach it in 24 seconds and we are 10 minutes and 5 seconds behind schedule. But we're not worrying about meeting a schedule this flight.
航法ブロックを見ましょう。ステアポイント1が選ばれ2.3マイル先です。24秒でそこに到着し、予定時間より10分50秒遅れています。しかしこの飛行では予定時間は気にしません。
From the mission briefing, we know that Steerpoint 2 is off to our right. If we begin a right turn 5 seconds early according to the NAV block, we'll roll out just about on course.
ミッションのブリーフィングにより、ステアポイント2が機体の右側方向である事は分かっています。航法ブロックを頼りに5秒前に右旋回を始めれば、旋回を終えた時ちょうどコース上になるでしょう。
Here it comes. Five seconds. Turning. Tadpole moving toward HUD center.
ここです。5秒前。旋回。タドポールがHUD中央に向かって動いています。
Heading bug moving under the heading caret. All lined up. And the HSI agrees. We're on the straight line course drawn between Steerpoints 1 and 2.
方位バグが方位キャレットの下側で動いています。そして一致しました。HSIも合っています。機体はステアポイント1と2を結ぶ直線コース上にいます。
And, as you saw on the briefing map, a barometric altitude of 2400 feet will keep us above the highest landforms this course line transits.
それから、ブリーフィングマップで見たように、気圧高度を2400フィートにすれば、このコースで通過する一番高い地形より上を飛ぶ事ができます。
Look at the NAV block again. The data has changed to the info for Steerpoint 2. Distance. Time remaining. DELTA. And, on the third line, well...time marches on. Sunset will be very soon.
航法ブロックをもう一度見ましょう。情報はステアポイント2に対するものに変わっています。残り時間。デルタ(予定との差)。そして3行目、現在時間はどんどん経過して行きます。日没は間も無くです。
Now just keep the tadpole pointing straight up, the heading bug and caret aligned, and the vertical line on the HSI aligned and pointing straight up.
今はタドポールが真上を向き、方位バグとキャレットが一致し、HSIの縦線が揃った状態で真上を指し続けるようにします。
If the vertical line on the HSI begins to break, turn slightly toward the break and pull it back into alignment.
HSIの縦線がずれてきたら、ずれた方向へ少しだけ旋回し、揃った状態に戻します。
Then resume the correct course.
そして正しいコースに復帰させます。
Since we have a minute, let's review how you calculate an intercept bearing when you are picking up a courseline.
1分ほど時間があるので、コースラインに乗ろうとする場合の合流針路の計算方法をおさらいしましょう。
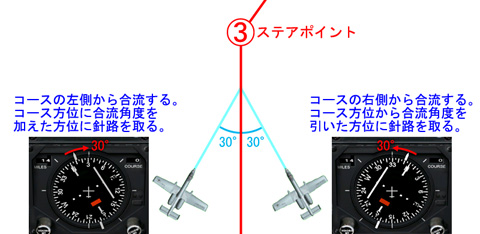
First, the usual intercept angles are either 30 or 45 degrees. When we were picking up the courseline to Steerpoint 1, the CDI tracking bar was to THIS side of the course indicator.
まず、通常の合流角度は30度か45度です。ステアポイント1へのコースに乗ろうとした時はCDIトラックバーはコース指示器のこちら側でした。
The numbers on this side get BIGGER as you move from the needles point to its tail. So you ADD the 30 or 45 degrees to the course indicated inthe upper right hand corner.
こちら側の数字は針の先から尾部に向かって回る時に大きくなるので、右上の角に表示されたコースの数値に30度か45度を加えます。
On the other hand, if the track bar had broken to THIS side, the numbers get smaller as you move from the needle point to the needle tail.
一方、トラックバーがこちら側にずれている場合は、針の先から尾部に向かって回る時に数字は小さくなります。
So you would SUBTRACT the 30 or 45 degree intercept angle from the required course.
ですから30度または45度の合流角度を指定コースから差し引きます。
Just remember. If the tracking bar is off to the side where the numbers are getting bigger, you add the intercept angle. If it breaks to the side where the numbers are getting smaller, you subtract the intercept angle.
これだけ覚えて下さい。トラックバーが数字が大きくなる方にずれていれば、合流角度を加えます。数字が小さくなる方にずれていれば、合流角度を差し引きます。
We're coming up on Steerpoint 2. Again we'll anticipate the turn and start 5 seconds early to smooth out the intercept of our new course line. We know from the briefing that it'll be a left turn. If we didn't know, the HSI and HUD indicators would point the direction out to us as soon as Steerpoint 3 was selected.
ステアポイント2に近付いています。再び旋回を先行させ5秒前に開始し滑らかに新しいコースラインに合流します。ブリーフィングから次は左旋回なのが分かっています。分からない場合は、ステアポイント3に切り替わった瞬間にHSIとHUDの指示がその方向を指します。
Five seconds. Turning. NAV block data has now changed to Steerpoint 3. Rolling out with the tadpole and heading caret and bug all lined up.
5秒前。旋回。航法ブロックはステアポイント3に変わりました。タドポールと方位キャレット、方位バグ全てが揃うように旋回を終えます。
We are once again precisely on course. And, from the briefing, the required altitude remains at 2400 feet.
再び正確にコース上を飛んでいます。ブリーフィングによれば、指定高度は2400フィートのままです。
We are now 6.5 nautical miles from the Steerpoint. And our arrival time is 1 minute and 16 seconds.
ステアポイントまで6.5マイルです。そして到着時間は1分16秒後です。
And it's getting darker out. The sun is going down and these valleys are getting dimmer and dimmer.
外が暗くなってきました。太陽が沈みこの辺りの渓谷はどんどん暗くなっていきます。
And Steerpoint 3 is coming up in 3.5 miles and, from the briefing, we know we will be turning right and climbing to a required altitude of 9200 feet above sea level.
そしてステアポイント3が3.5マイルに近付き、ブリーフィングによって、この後右に旋回し海抜9200フィートの指定高度に上昇すべきである事が分かっています。
We'll anticipate the turn again.
再び先行して旋回します。
Five seconds. Turning.
5秒前。旋回。
Rolling out. The CDI indicates that we need to steer to the right of the required course by a bit to get ourselves precisely back on course.
旋回終わり。正確にコースに戻るためには指定コースの少しだけ右へ舵を切らねばならない事をCDIが示しています。
The required course of 116 degrees. We're pulling the track bar back in line.
指定コースは116度。トラックバーを一本線に戻している所です。
There it is. And now we'll turn to keep all indicators aligned on 116 degrees.
揃いました。そして旋回し全ての指示が116度に一致し続けるようにします。
We're good. Everything is lined up on the HUD. A solid white needle pointing straight up on the HSI. Course 116 degrees.
よろしい。HUD上の全てが揃っています。HSI上の一本になった白い針が真上を指しています。コースは116度。
This is definitely not terrain I'd want to abandon the aircraft in. I certainly wouldn't want to crash out here.
こういう地形では絶対に機体を放棄したくないですね。この辺りでクラッシュしたいとは一切思いません。
Once we get to altitude, I'll select Steerpoint 5 early using the 'TILDE' (~) key. Since we have good visibility, we'll cut the corner and intercept the course line. Doing this in low visibility, though, could be very dangerous because we will not be on our planned course as we cut the corner.
高度に達したら、「~」キーで早目にステアポイント5を選ぶつもりです。視界が良いので、近道をしてコースラインに合流します。しかし、視界が悪い時にこういう事をすると、近道した分だけ計画したコースを外れるので非常に危険な場合があります。
When we intercepted the courseline to Steerpoint 1, we used an intercept angle of 30 degrees. We'll do the same here. But this time, you'll see that the heading degrees get smaller as you move from the steerpoint needle's head and it's tail because the tracking bar will break to the other side.
ステアポイント1に合流する際は、30度の合流角度を用いました。ここでも同じ事をします。しかし今回は、トラックバーが反対方向にずれているためにステアポイント針の先端から尾部へ回る時に方位角が小さくなっていくのが分かるでしょう。
So we'll be subtracting those 30 degrees from required course.
ですから指定コースから30度を差し引きます。
'TILDE' (~) key to cycle to the next steerpoint, 5.
「~」キーで次のステアポイント5に切り替えます。
Track bar is on the side where the numbers get smaller between the head and tail. Required course is 226. Subract 30 for an intercept heading of 196.
トラックバーは先端と尾部の間で数字が小さくなる側にずれています。指定コースは226度。30度を引いた合流方位は196度です。
This is why you don't cut corners in low visibility. I had to climb to clear this ridgeline.
Now we've settled in on a course of 196. We're pulling in the track bar. Begin our turn to get ourselves on course.
これで視界が悪い時に近道をしたくない理由が分かりますね。この稜線を避けるために上昇する必要がありました。
そして196度のコースに安定しました。トラックバーが中に入ってきました。旋回を始めて指定コースに合流します。
I'll hold us off here for a bit and let the track bar come all the way in.
少しこのままにしてトラックバーが完全に中心になるようにします。
Holding off.
Okay. It's aligned.
And we'll finish turning to ur heading of 226 degrees.
もう少しこのまま。
OK。揃いました。
そして旋回を終え機体方位226度にします。
And, once again we are on course. All the HUD indicators are lined up and the steerpoint needle and track bar on the HSI are aligned and pointing straight up.
こうして、またコースに戻りました。全てのHUD指示は揃いHSI上のステアポイント針とトラックバーは一本になり真上を指しています。
We are on course and losing altiude. The required altiude upon reaching Steerpoint 5 is, once again, 2400 feet as we know from the briefing.
コース上で高度を下げています。ステアポイント5に到達するまでの指定高度は、ブリーフィングから分かるように再び2400フィートです。
Also, from the briefing map, you remember that Steerpoint 5 was the last steerpint before landing. So, when we reach Steerpoint 5, the NAV computer will automatically switch to the 'Return' mode and direct us to the IAF or 'Initial Approach Fix' for landing.
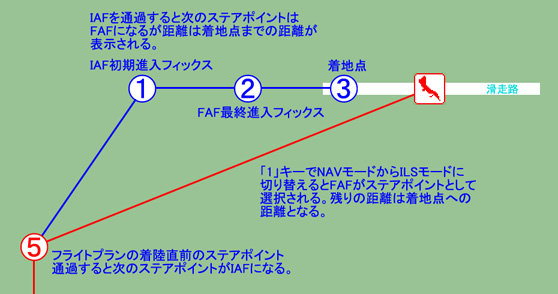
また、ブリーフィングマップからステアポイント5が着陸前最後のステアポイントなのを覚えていますね。ですからステアポイント5に着いたら、航法コンピュータが自動的に「帰還」モードに切り替わり、着陸にためにIAF初期進入フィックスに導いてくれます。
Sure is a pretty evening.
美しい夕べですね。
3.5 miles to Steerpoint 5.
ステアポイント5まで3.5マイル。
And, since we know that the IAF is to our right from the briefing, I'll begin the turn 5 seconds early again.
ブリーフィングによってIAFは機体の右側なのが分かっているので、今回も5秒前に旋回を始めます。
Here we go.
And roll out smoothly on the new course of 253 degrees. Line everything up on the HSI and the HUD.
今です。
緩やかに旋回を終え253度の新しいコースに乗ります。HSIとHUDの全ての指示を揃えます。
I'm going to start descending and slowing down. I want to be at an altitude of 1500 feet with an airspeed of 250 knots when we enter Sukhumi's terminal airspace.
降下と減速を始めます。Sukhumiのターミナル空域に入る時に高度1500フィート、速度250ノットにしておきたいです。
Let's focus in on those 5 basic flight instruments for a moment.
少しの間、5つの基本飛行計器に集中しましょう。
We know without looking at the HUD or out the canopy that we are flying wings level on the ADI.
Our airpeed is currently 257 knots.
Our altitude is 1920 feet.
We are decending at about 700 feet per minute.
HUDやキャノピーの外を見なくても、ADIで機体が水平に飛行している事が分かります。
機体の速度は現在257ノットです。
高度は1920フィート
毎分約700フィートで降下中です。
We are on a heading of 253 as indicated on the HSI.
HSIに示されたように針路253です。
And we are 11 miles from the IAF.
そしてIAFから11マイルです。
On the HUD, the NAV block is giving us the information for the IAF. We are 10 nautical miles distant.
At this airspeed, we should arrive in 2 minutes and 13 seconds.
HUD上の航法ブロックがIAFの情報を示しています。10マイルの距離です。
現在の速度なら、2分13秒で到着するはずです。
And notice that we are now 21 seconds ahead of schedule. To be precisely on time, we'd slow down until we were.
予定より21秒先行しているのが分かります。時間に正確に合わせるつもりなら、合うまで減速しなければなりません。
And the current time is 2100 hours and 15 minutes.
現在時刻は21時15分です。
We are now level at 1500 feet 6 miles from the IAF. Sukhumi is at our 2 o'clock but hidden by the canopy rail.
IAFから6マイル、1500フィートで水平飛行中です。Sukhumi飛行場は2時方向ですがキャノピー枠の影になっています。
Our airspeed 250 knots.
対気速度250ノット。
5 miles from the IAF. Select approach flaps with the 'F' key and start slowing to 170 knots. When we reach the IAF, the NAV computer will switch to the ILS mode automatically so that we can line up with the runway.
IAFまで5マイルです。「F」キーでアプローチフラップ(ハーフフラップ)を選び170ノットへの減速を始めます。IAFに到達すれば、航法コンピュータが自動的にILSモードに切り替わり、滑走路に機体の向きを合わせる事ができるはずです。
We will use the localizer bar to center us on the runway but, starting as we are at 1500 feet altitude, we'll be under the glideslope.
ローカライザーバーを使って滑走路に対し正対するつもりですが、現在の高度1500フィートから始めるのでグライドスロープより下になるでしょう。
So we'll hold level at this altitude and intercept it part way to the runway.
ですから、この高度を保って滑走路に向かう途中でグライドスロープに合流するつもりです。
There's Sukhumi in the sunset.
夕陽の中のSukhumi飛行場が見えます。
Holding our altitude at about 1500 feet and our altitude at 170 knots.
機体高度を約1500フィートに、速度を170ノットに保ちます。
2.1 nautical miles from the IAF. Roughly 41 seconds to go.
IAFから2.1マイルです。到着まで約41秒。
There's the switch. Turn right to line up the needles on the HSI so we're on the runway heading of 296 degrees.
切り替えがありました。右に旋回しHSIの針を揃えて、滑走路の方位296度に向かいます。
Up on the HUD, you can see the ILS localizer and glideslope guidance bars. These are also being repeated on the HSI.
HUD上には、ILSローカライザーとグライドスロープの誘導バーが見えています。ADIも同じ状態になっています。(訳注:原文の誤りを修正しました。)

The localizer bar is fairly well centered. We'll hold level at this altitude until the glideslope bar is close to the center as well. Then we'll begin descending and make a smooth intercept of the slope.
ローカライザーバーはかなりうまく中央に来ています。またグライドスロープバーが中央に近付くまでこの高度で水平飛行を保ちます。その後に降下を始め滑らかにスロープに合流します。
The glideslope bar is moving down toward the center, so I'm extending my landing gear with the 'G' key and turning the landing lights to 'bright' by pressing the 'ALT-L' key once.
グライドスロープバーが中央に向かって下がって来ていますから、「G」キーで車輪を下ろし「Alt L」を一度押して着陸灯を明るくします。
Confirm three green.
3つのグリーンランプを確認。(訳注:車輪下げを示す。)
Still centered on the localizer bar.
ローカライザーバーは中心のままです。
Glide slope bar is dropping.
Intercept coming up.
グライドスロープバーが下がってきました。
合流は間もなくです。
Slowly begin our descent.
ゆっくりと降下を始めます。
We've smoothly intercepted the glideslope.
滑らかにグライドスロープに合流します。
Hold our decent rate at roughly 800 feet per minute.
降下率をおよそ毎分800フィートに維持します。
That's the FAF or Final Approach Fix tone. Select 'landing flaps' with the 'SHIFT-F' keys. Compensate for the extra lift by adjusting your trim.
FAF最終アプローチフィックスの告知音が鳴りました。「Shift F」キーで「着陸フラップ」(フルフラップ)を選択します。増加した分の揚力を打ち消すようにトリムを調整します。
Now we're fully configured for landing. Keep a stabilized approach to the runway. Don't overcompensate. In these slow speed regimens, it takes time for control inputs to take effect. So be patient. Don't over compensate.
これで完全に着陸用の構成になりました。滑走路に向け安定化進入を維持します。修正をし過ぎないように。このような低速域での補正では、コントロールの入力が効き始めるまでに時間が掛かります。修正をし過ぎないように。
Keep your final approach speed between 150 and 160 knots.
最終進入速度は150から160ノットの間に維持します。
As we're coming in on the fence, I'm going to let our airspeed drop farther. Slowly reduce it.
フェンスにかかる所で、さらに速度を下げます。ゆっくり減速します。
Coming in over the fence. Throttling back to drop us to our landing speed.
フェンスを超えました。スロットルを引き着陸速度に減速します。
Watch the radar altimeter. We'll flare just before touchdown.
レーダー高度計を監視します。着地直前にフレアをかけます。
Pull back on the stick to flare and settle to the runway.
操縦桿を引きフレアをかけて滑走路に着地します。
Safely down! Airbrakes out with the 'B' key. Apply wheel brakes with the 'W' key.
安全に着地しました!「B」キーでエアブレーキを開きます。「W」キーで車輪ブレーキを掛けます。(訳注:「W」キーは押している間だけ働きます。)
That concludes my portion of this navigation and ILS training flight.
これで、私の航法とILSの訓練飛行を終了します。
You now have a choice. There is plenty of fuel left.
燃料はたっぷり残っていますから、また飛んでも構いません。
And I will reset the NAV computer to Steerpoint 1.
航法コンピュータをステアポイント1にリセットしておきます。
If you wish to continue and take the Hog up on your own, press the 'CTRL-Q' keys, reset the flaps and airbrake, turn right at the next intersection, and follow the taxiway back to the runway. Just remember that it's getting darker all the time.
引き続き自分でこのイノシシを飛行させたいのであれば、「Ctrl Q」を押して、フラップとエアブレーキをリセットし、次の交差路で右に曲がり、滑走路に戻る誘導路を進んで下さい。ただしどんどん暗くなっているのを忘れないで下さい。
Or press the 'ESC' key and exit this mission. You can then restart it and fly in brighter daylight.
または「ESC」キーを押してミッションを終えて下さい。その後に再スタートして明るい光の中で飛ぶ事もできます。
Thank you. You have control.
お疲れ様。操縦を任せます。
<以上>