A-10A:AIM-9サイドワインダー空対空ミサイル
Hello and welcome. During this flight you will learn how to employ the Raytheon AIM-9 Sidewinder air-to-air missile. The Sidewinder is an all aspect, infra-red heat seeking missile. And we normally carry two on pylon 11. It's important to remember, however, that the A-10 is not an air-to-air offensive platform. We use this missile in self defense.
ようこそ。この飛行では、レイセオン社製AIM-9サイドワインダー空対空ミサイルの運用方法を学びます。サイドワインダーは全方位赤外線追尾ミサイルです。そして通常パイロン11に2発搭載しています。しかし、A-10は空対空攻撃機ではない事を忘れないで下さい。このミサイルは自己防衛に用います。
You can pause the mission at any time with the 'S' key. That will be especially helpful, if you are trying to read the text.
Labels are enabled but I have manually turned them off for this flight. You toggle them on and off with the following key combinations:
'SHIFT-F2' for aircraft,
'SHIFT-F6' for missiles and bombs,
'SHIFT-F10' for ground units.
ミッションを好きな時に一時停止するには「S」キーを押します。これはテキストを読む場合に特に便利でしょう。
ラベルが使用可能になっていますがこの飛行では手動で消しています。以下のキーでオンオフの切り替えができます。
「Shift F2」:航空機
「Shift F6」:ミサイルや爆弾
「Shift F9」:地上ユニット
Finally, to take control of the aircraft at any time, press the 'CTRL-Q' keys. To exit this mission completely, press the 'ESC' key.
そして、「Ctrl Q」キーを押せば、いつでも操縦を引き継げます。ミッションを終了するには「ESC」キーを押します。
Thank you. I have control.
では、私が操縦します。
I had laid on a standard training flight for this afternoon but those plans have changed. There's an armoured column advancing on a small NATO blocking force in the Hachemzij Valley. We're being scrambled to intercept it. So you'll be getting your training today 'on the job'. Just sit tight and I'll give you more details, once we're in the air.
この午後のために通常の訓練飛行を準備していましたが計画は変更になりました。Hachemzij渓谷のNATO軍阻止部隊に向かって装甲車列が進軍しています。我々はこれを迎撃するために緊急招集されました。ですから今日は「実戦での」訓練になります。しっかりと腰を据えて下さい。飛行中に詳細を説明します。
Let's button up and bring this Hog to life.
Canopy coming down. And locked.
Power to the engines.
気を引き締めて、このイノシシに息を吹き込みましょう。
キャノピーを閉じます。そしてロック。
エンジンに火を入れます。
While the engines are spooling up, I'll give you a quick primer on using the AIM-9.
You select the AIM-9s by pressing the '6' key. The sound you hear is the growl of the missile's seeker head searching for a target and this circle represents the present focus of the seeker. But it's actual Field of Regard is only slightly larger than this. Because this aircraft has no air-to-air radar, targeting air threats is no easy matter. First you have to visually locate and, then, ID the intended target. Next you must maneuver the aircraft to pull the target into the HUD and close to this circle.
エンジンの回転数が上がる間にAIM-9の使用方法の概要を説明します。
AIM-9を選ぶには「6」キーを押します。ミサイルのシーカーヘッドがターゲットを探知するうなり音が聞こえ、このサークルがシーカーの現在の焦点を示します。しかし実際の感知範囲はこれより少しだけ広くなっています。この機体には空対空レーダーがないので敵航空機を狙うのは簡単ではありません。まず目視で位置を把握し、その後目的のターゲットを識別します。次に機体を操作してターゲットをHUD内のこのサークル近くに捉える必要があります。
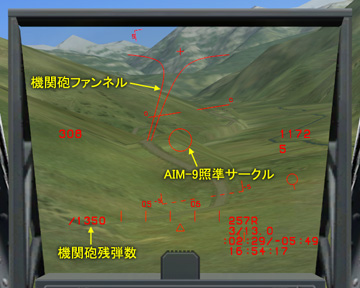
Once the target aircraft is within range, the seeker will lock onto it and two things will happen at once. The circle will snap around the target and begin flashing on and off. At the same time that growl will change to a high pitched tone which is hard to ignore.
ターゲット機が射程内に入れば、シーカーがターゲットにロックし同時に2つの事が起こります。このサークルがターゲット付近に飛び移り点滅を始めます。同時にうなり音が聞き逃しようのない甲高い信号音に変わります。
I want to emphasize, however, that until you launch the missile, you MUST keep the target centered in the HUD. If you allow it to fall outside the Sidewinder's Field of Regard, you will lose the lock and have to reacquire. To repeat, targeting an air threat in the A-10 is no easy task.
一方で強調しておきたいのは、ミサイルを発射するまで、ターゲットをHUD中央に維持しなければならない事です。もしもターゲットがサイドワインダーの感知範囲から外れてしまうと、ロックが外れ再捕捉しなければならなくなります。繰り返しますが、A-10で敵機に狙いを付けるのは簡単な事ではありません。
Okay. Let's finish setting up. Nav lights on.
Flaps to take off position.
Three clicks of positive trim.
よろしい。準備を終えてしまいましょう。航行灯オン。
フラップは離陸位置。(ハーフフラップ)
トリムを正方向に3回押します。
Tower. Springfield 1-1. Permission to taxi.
管制塔へ、スプリングフィールド1-1、地上走行許可を求めます。
Springfield 1-1 taxiing.
スプリングフィールド1-1、地上走行します。
Let's check the pattern for aircraft.
Everything looks clear.
経路上の航空機を確認しましょう。
全て障害無しです。
The pattern still looks clear. We'll take the runway.
いまだ経路上の障害無し。滑走路に入ります。
Tower. Springfield 1-1. Permission to take off.
管制塔へ、スプリングフィールド1-1、離陸許可を求めます。
Springfield 1-1 is rolling.
スプリングフィールド1-1、滑走開始。
Positive rate of climb.
昇降率プラス。
Gear coming up.
車輪上げ。
Altitude 500 feet. Flaps in.
高度500フィート。フラップ上げ。
Reportedly, that enemy column is accompanied by two or three ground attack helicopters. Depending on their 'flavor', they could be a real threat to us. So you'll see the AIM-9 in action but this won't be the usual training flight.
報告では、敵車列には2、3機の地上攻撃ヘリが同行しています。それらの装備次第では、我々にとって大きな脅威に成りえます。ですから今回はAIM-9の運用状態を見るだけの普通の訓練飛行とは違うのです。
Our problem, of course, is to visually locate, ID, and target them as early as possible. If the situation allows, it's usually a good idea to get low because it's easier to spot them when they're silouetted against the sky.
もちろん、我々の課題は、目視でできるだけ素早くターゲットの位置を特定し、識別し、狙いを付ける事です。それには状況が許せば、低い位置にいる方が良い場合が多いです。なぜならターゲットが空を背景にしたシルエットになるので発見し易くなるからです。
And, since we have AGM-65Ds under our wings this afternoon, I'll show you another neat trick. You can use the D's infra-red imagining and 6 power magnification to extend and enhance your vision. This also works with the 'K' model but not nearly as well. The K's magnification is less and you don't have the infr-red signature to enhance contrast.
そして、この午後の飛行ではAGM-65Dを搭載しているので、もうひとつの裏技をお見せします。D型の赤外線映像と6倍の倍率を、あなたの視力を補う手段として使うのです。「K」型でも同じ事ができますが効果はそれほどではありません。K型は倍率が低くコントラストを増大させる赤外線指標も使えないからです。
Let's call up air-to-ground mode and cycle to the AGM-65Ds.
空対地モードを起動しAGM-65Dに切り替えましょう。
Of course, if you don't have Mavericks along, locating and ID-ing your target will be more difficult. You'll have to search for them with the Mark-1 eyeball.
もちろん、マベリックを搭載していなければ位置確認と識別の難易度は高くなります。あなたの肉眼のみで探さなければなりません。
That's the valley entrance.
あれが渓谷の入り口です。
This is the NATO position. Now slew the aiming reticule all the way to the top of the HUD and start searching. When you find them, the postion of the reticule on the HUD will tell you more or less where they are.
ここがNATO軍の位置です。照準レティクルをHUDの最上部まで動かし探知を始めましょう。見つかったらHUD上のレティクルの位置で敵のいる大体の場所が分かります。
There's something. Ground stabilize. Magnify.
何か見えます。レティクルを地表に固定。拡大。
There they are.
いました。
Look like Hinds to me.
ハインドのように見えます。
Call up the Sidewinders with the '6' key. I've got a talley. Targets into the center of the HUD.
「6」キーでサイドワインダーを呼び出します。ターゲットを目視捕捉しました。HUD中央にターゲットを入れます。
Lock! Flashing circle. Tone. Opps!
He got too far from the center of the HUD.
ロック!サークルが点滅。信号音。おっと!
ターゲットがHUDの中央から離れすぎました。
Lock! Flashing circle. Tone. Press 'ENTER' to launch. Fox 2!
ロック!サークルが点滅。信号音。「Enter」で発射。フォックス2!
Defensive break and countermeasures. We don't know exactly what's in that column so I'm going to play it safe.
回避ブレイクと対抗手段を使用します。車列にどんな敵がいるのか分からないので安全策をとるのです。
Whoah! There WAS a SAM launch!
うわ!SAMが発射されていました!
Well we know that there's a ZSU-23 and at least one SAM platform providing anti-air coverage for these guys.
これで、ZSU-23と、少なくとも1台のSAM砲台車が彼らの対空防衛になっている事が分かりました。
I'm going to circle back and see if we can spot exactly where that SAM came from. He's the main threat right now.
旋回し戻って、SAMが飛んできた場所を特定できないか試してみます。このSAMが現在の主要な脅威です。
And, judging from the smoke, it looks like we got our kill.
それと、煙から判断するに、撃墜は成功したようです。
SAM launch! Looks like it's from the fourth vehicle in the column.
Break and countermeasures!
SAM発射!車列の4番目の車両からのようです。
ブレイクし対抗手段を使います!
Okay! Another close one! Let's not do this anymore.
大丈夫でしょう!今度も近かった!こんな事はもう止めましょう。
I've set you back to Nav mode and I'm opening the range. There is one Hind remaining and you have one AIM-9. I'll set you up for an attack. Select the remaining AIM-9 by pressing the '6' key. Then visually acquire the Hind and maneuver the aircraft to bring him into the center of the HUD. He is locked when the seeker circle snaps to the target and begins flashing. Press the 'ENTER' key to launch.
NAVモードに戻しターゲットから距離をとります。ハインドが1機生き残っていて、こちらのAIM-9は1発あります。あなたが攻撃できるように準備しましょう。残ったAIM-9を選ぶには「6」キーを押して下さい。そしてハインドを目視で捕捉し機体を操作してHUD中央に敵を捉えます。シーカーサークルがターゲットに飛び移り点滅したらロックしたという事です。「Enter」キーを押して発射します。
I'd advise keeping your distance from that column. We know that there's a ZSU-23 down there and at least one SAM platform providing anti-air coverage. If you're planning to take on that column, I'd suggest taking out the SAM first with an AGM-65D. That SAM has the longest range. It looked like he was the fourth vehicle in the column.
車列にあまり近付かない方が良いと思います。ZSU-23が1台とSAM砲台車が少なくとも1台あって対空防衛になっています。もしも車列を攻撃するつもりなら、最初にSAMをAGM-65Dで破壊すると良いでしょう。SAMは車列の4番目の車両のようでした。
Use another Maverick on the Shilka. He'll be easy to spot. He's the one with the radar mounted on his turret.
もう1発のマベリックをShilkaに対して使うと良いでしょう。Shilkaは識別し易いはずです。砲台の上にレーダーが載っているのがShilkaです。
I'm going to drop us back into the valley and, then, it'll be your turn to take control.
高度を下げ渓谷の中に戻ります。そして今度は、あなたが操縦を引き継ぐ番です。
Now it's likely that the remaining Hind has gone to a higher altitude for more maneuvering room. I'd look for him well above our current altitude.
今頃残ったハインドは機動し易いように高高度に上がっていると思います。こちらの現在高度よりもずっと上を探すと良いでしょう。
It's show time. Press the 'CTRL-Q' keys to take control. Or the 'ESC' key to exit the mission completely.
さあ、ショーの時間です。「Ctrl Q」キーで操縦を引き継ぐか、「ESC」キーで終了してください。
Thank you. You have control.
お疲れ様。操縦を任せます。
<以上>