A-10A:CCRP投下点連続算出式爆撃モード
Hello and welcome. We are enroute to the Tkvarcheli weapons range to practice Continuously Computed Release Mode--CCRP--bombing. Viewing the third A-10 tutorial, 'Unguided Bombing', is a prerequisite for today's flight.
ようこそ。我々はCCRP投下点連続算出モードでの爆撃訓練をするためTkvarcheli射爆練習場に向かっています。今日の飛行に先立ってA-10の3番目のトレーニング「無誘導爆弾」を見ておいて下さい。
During this mission we'll be delivering Mk-20 cluster munitions--labeled 'CW' on the ACP. To take control of the aircraft at any time, press the 'CTRL-Q' keys. To exit this mission completely, press the 'ESC' key. Thank you. I have control.
このミッションではMk-20クラスター兵器(ACPでは「CW」と表示される)を投下します。「Ctrl Q」キーを押せば、いつでも操縦を引き継げます。ミッションを終了するには「ESC」キーを押します。では、私が操縦します。
A few additional notes:
1) You can pause the mission at any time with the 'S' key. That will be especially helpful, if you are trying to read the text.
2) Labels are enabled so you can toggle them on and off with the appropriate keys.
更に何点か注意点を:
1) ミッションを好きな時に一時停止するには「S」キーを押します。これはテキストを読む場合に特に便利でしょう。
2) ラベルが使用可能になっているので適切なキーでオンオフの切り替えができます。
3) And, finally, should you take control of the aircraft, check the HUD. If you see 'ALT HLD' displayed, press the 'H' key to regain altitude control. And if you find that you have no speed control, press the 'J' key.
3) そして最後に、機体の操縦を引き継いだ場合は、HUDを確認して下さい。「ALT HLD」になっていたら、「H」キーで高度のコントロールを復元させて下さい。また、速度をコントロールできないと分かったら「J」キーを押して下さい。
Let's begin. Unlike the CCIP mode which requires the bomb impact point to be visible in the HUD and, therefore, the aircraft to be in a dive, CCRP bombing automates the bomb release so that munitions can be dropped even though the target has passed below the level of the HUD and you are in level flight.
さあ始めましょう。爆弾の着弾点がHUD内に見えていないといけない、つまり機体を降下させないといけないCCIPモードと違って、CCRP爆撃は爆弾投下を自動化し、ターゲットがHUDの表示範囲の下を通り過ぎたり水平飛行したりしていても兵器を投下できます。
Let's practice without actually releasing weapons. Call up the A2G weapons mode with the '7' key. Cycle weapons with the 'D' key if necessary.
実際に兵器を投下せずに練習してみましょう。「7」キーで空対地モードを起動します。必要があれば「D」キーで兵器を切り替えます。
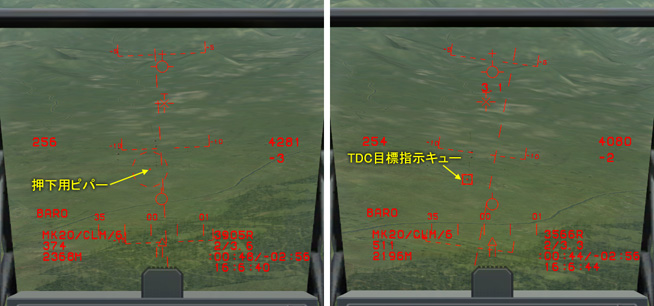
Now look at the HUD. This is the normal CCIP mode. But now take note of this circular aiming reticule with a center dot. This is the depressible pipper. You can slew it with the usual keys (/.,;).
HUDを見て下さい。これは通常のCCIPモードです。しかし今回は、この中心にドットのある照準レティクルに注目して下さい。これが押下用ピパーです。これは通常の移動キー(/.,;)で動かす事ができます。
Slew the aiming reticule until the center dot covers the target.
照準レティクルを動かし中心のドットがターゲットが重なるようにします。
Press 'TAB' to lock the target location and display a fixed square called the Target Designation Cue or TDC. This position is now stored in our aircraft's inertial navigation system.
「Tab」を押してターゲット位置をロックするとTDC目標指示キューと呼ばれる固定された四角形が表示されます。これで、この位置は機体の慣性航法装置に記憶されました。
Press the 'O' key to enter CCRP mode. The dashed bomb fall line turns solid with the TDC at the top and the bombing pipper at the bottom. This number under the flight path marker is the slant range, in nautical miles, to the target.
「o」キーを押してCCRPモードに入ります。点線の爆弾投下ラインが実線に変わり、TDCが上端に、爆撃ピパーが下端に表示されます。フライトパスマーカーの下の数値はマイル(海里)単位のターゲットまでの直線距離です。
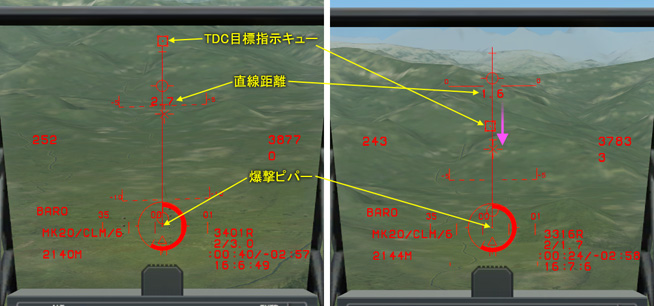
Maneuver the aircraft to keep the TDC box centered on the top of the bomb fall line. As we approach the target the TDC box will move down this line. When it passes over the bombing pipper's center dot, the bombs will release automatically.
TDCボックスが爆弾投下ラインの上端の中心からずれないように機体を操作します。ターゲットに近付くに従ってTDCボックスが線に沿って下がります。ボックスが爆撃ピパーの中心ドットを通り過ぎると、自動的に爆弾が投下されます。
Keep the TDC box centered on top of the line...
If it goes too far to the right or left, the munitions will not release.
But we will cancel before release because I do not want to drop any munitions at this point.
TDCボックスが線の上端の中心からずれないようにします・・・。
右や左にずれ過ぎると兵器は投下されません。
しかし現時点では兵器を投下したくないので、投下前にキャンセルします。
There it goes. Let's hit 'O' again to cancel. Press 'TAB' to release the lock. And press 'CTRL-I' to recenter the aiming reticule. We are now back in the standard CCIP mode.
動き出しました。「o」をもう一度押してキャンセルしましょう。「Tab」を押してロックを外します。そして「Ctrl i」を押して照準レティクルを中央に戻します。これで通常のCCIPモードに戻りました。
And there's the weapons range dead ahead. From the briefing we know that this is a ZSU-23 guarding this column which is OUR target. Since it's possible to use the TDC to pass a target on to a wingman, let's give ours something to do. Here's how.
射爆練習場が真正面に見えます。ブリーフィングから、この車両はZSU-23で我々のターゲットの車列を防御している事が分かっています。TDCを使って僚機にターゲットを指定する事ができるので、何かやらせてみましょう。やり方はこうです。
Slew the aiming reticule. Place it over the ZSU-23. And lock to designte the target. I'll order our wingman to attack it soon but not just yet. I want his attack to be coordinated with our own.
照準レティクルを動かし、ZSU-23に重ね、ターゲットを指定するためロックします。もう少ししたら僚機に攻撃指示を出すつもりですが、今はまだ出しません。僚機の攻撃と我々の攻撃を協調させたいからです。
As we turn away, look at the HUD. Notice that, even though the target is no longer in the HUD, the square target marker is still visible. It's position along the left side of the HUD indicates that the quickest way to get the target back into the HUD is to turn left. If it were to the right side of the HUD, a right turn would be indicated.
旋回して離れる間に、HUDを見てみましょう。ターゲットがHUDから外れているのに、四角のターゲットマーカーが見えていますね。HUDの左側に沿ったマーカーの位置で、ターゲットをHUD内に戻すための近道が左旋回である事を示しています。もしこれがHUDの右側なら、右旋回を示します。
Let's set ourselves up for an attack on that column. It looked fairly long and we know from the briefing that it's composed of fairly soft targets. So we can use a minimum of munitions and still ensure kills.
I'll set the release mode to 'RPL SGL', the 'RPL QTY' to '4', and the 'RPL INTVL' to '85'. The '85' milliseconds will spread the cluster munitions along the length of the column to maximize the kill zone.
さっきの車列を攻撃するための準備に掛かりましょう。車列はとても長く見えましたし、ブリーフィングから非常に破壊しやすいターゲットで構成されている事が分かっています。ですから最小限の兵器を使用しても破壊できるはずです。
投下モードを「RPL SGL」に、「RPL QTY」を「4」に、「RPL INTVL」を「85」に設定します。「85」ミリ秒なら車列の長さにわたってクラスター兵器が分散し破壊領域を最大化できます。
Now let's get to work. Let's tell our wingman to attack the target we designated for him through the comms menu. Press the 'BACKSLASH' key. Then press 'F1' (Flight), F1 again (Engage), and F1 a third time (My target).
では仕事に掛かりましょう。通信メニューで僚機に指定したターゲットを攻撃するよう指示します。「\」キーを押します。次に「F1」(Flight)を押し、もう一度「F1」(Engage)、そして3度目の「F1」(My target)を押します。
Continue to separate so that he'll be a bit ahead of us and his bombs will arrive first.
引き続き遠ざかって、僚機が我々より少し先行し、その爆弾が最初に着弾するようにします。
Turn east while '2' sets up. Just a quick note here. After giving him the command to attack, I could cancel the position lock on the HUD by pressing the 'TAB' key because he no longer needs it. But I'm keeping that ZSU-23 locked because having the TDC on the HUD simplifies orientation for me.
2番機が準備する間に東に旋回します。ちょっとだけコツを説明します。僚機に攻撃指示を出した後は、HUD上のロック位置はもう必要がないので「Tab」キーでキャンセルできます。しかし、今回はさっきのZSU-23をロックしたままにして、HUD上にTDCを出しておき機体の針路決定が楽にできるようにしています。
When it moves to the center of the HUD, I know my nose is pointing in the right direction again.
TDCがHUD中央に動いてくれば、機首が再び正しい方向を指していると分かります。
Time for our run in on the target.
ターゲットに向かい攻撃開始する時です。
We're lining up. Press 'TAB' to release the lock and 'CTRL-I' to recenter the aiming reticule. Now let's put the center dot of the aiming reticule on the lead vehicle.
正対します。「Tab」を押してロックを外し「Ctrl i」で照準レティクルを中央に戻します。そして照準レティクルの中心のドットを先頭車両に重ねます。
Slew...
カーソル移動・・・
Lock...
ロック・・・
Press 'O' to enter CCRP mode. Box at the top. Maneuver the aircraft to keep the TDC balanced on top of the bomb fall line as the range closes.
「o」を押してCCRPモードに入ります。ボックスが上端に来ました。距離を詰める間、TDCが爆弾投下ラインの上端で釣り合いを保つように機体を操作します。
The target box is sliding down the line. Let its center pass over the pipper's center dot.
ターゲットボックスが線上を下がって行きます。ピパーの中心ドットの上を通り過ぎるようにします。
BOMBS RELEASED automatically.
自動的に爆弾が投下されました。
Let's maneuver and see how we did.
旋回してどうなったか見てみましょう。
OKAY! Good hits right down the line.
素晴らしい!車列のちょうど真上に命中です。
I think we got them all.
全ての車両を破壊したようです。
And now that the munitions have been released, the HUD is back in the normal CCIP mode.
そして兵器が投下されたので、HUDは通常のCCIPモードに戻りました。
Let's call '2' back into formation.
2番機を編隊に呼び戻しましょう。
Now let's swing back and give you a good look at the weapons range.
では、戻って射爆練習場を詳しく説明しましょう。
Here are two target circles.
ここに2つのターゲットサークルがあります。
And four gas tanks.
4つの燃料タンク。
And a second column for you to attack.
そして攻撃目標の2つ目の車列です。
And a lone Gvozdika motorized howitzer.
それから1台離れた場所にあるGvozdika自走榴弾砲です。
And now it's your turn. You have six cluster munitions left. And you are currently in 'RPL SGL' release mode. I suggest that you change to 'SGL' release mode and use two of the Mk-20s to practice CCRP bomb delivery targeting two of the four fuel tanks down there.
さあ、あなたの番です。まだ6発のクラスター兵器が残っています。また、投下モードは「RPL SGL」です。まずは「SGL」投下モードに切り替えて2発のMk-20を使って、4つある燃料タンクの内2つを狙ってCCRP爆撃の練習をすると良いと思います。
They have high visiblity from a distance. So they should be easy for you to spot and target early.
タンクは遠くからもはっきり見えます。ですから早めに発見し狙いを付けるのは簡単なはずです。
Once you've finished, switch back to one of the ripple modes and attack the remaining column. Designate targets for your wingman as well.
それを終えたら、連続投下モードのどちらかに切り替えて残っている車列を攻撃して下さい。同時に僚機にターゲット指示もして下さい。
A final note on designating targets. In this sim, wingmen will only attack active targets, i.e. those for which you can assign waypoints. They will ignore buildings and static objects. So that Gvozdika and any vehicles that you miss (if any) can be assigned.
ターゲット指示に関して最後の注意点を述べます。このシムでは、僚機は移動可能な、つまりウェイポイント指定可能なターゲットのみを攻撃します。彼らは建造物や固定オブジェクトは無視します。ですから、さっきのGvozdikaや(もしかして)撃ち損じた車両があれば指定可能です。
The fuel tanks and target circles cannot be assigned.
燃料タンクやターゲットサークルは指定できません。
I'm swinging you around to the north end of the range.
練習場の北端付近に機体を飛ばしておきます。
I recommend that you now press 'CTRL-Q' and take control of the aircraft yourself. Then, when you've expended the remaining munitions, press the 'ESC' key to exit, restart the mission, and fly it yourself.
「Ctrl Q」を押して操縦を引き継ぐと良いでしょう。そして、残った兵器を使い切ったら、「ESC」キーを押して終了し、ミッションを再スタートさせ自分で飛行して下さい。
Thank you. You have control.
お疲れ様。操縦を任せます。
<以上>