F-15C:M61A1バルカン砲とAIM-9サイドワインダー
Welcome to the gun and AIM-9 training mission in the F-15C. In this flight you will learn how to use the General Electric, they make more then just light bulbs you know, M61A1 Vulcan rotary cannon and the AIM-9M Sidewinder heat seeking short range dogfight missile.
F-15Cの機関砲とAIM-9の訓練ミッションにようこそ。この飛行ではジェネラルエレクトリック社の製品であるM61A1バルカン回転式機関砲とAIM-9Mサイドワインダー赤外線誘導短距離格闘戦用ミサイルの使い方を学びます。この会社は電球だけを作っているのではないのです(笑)。
You will be using these weapons during Within Visual Range or WVR encounters and dogfights. To take control at anytime press the 'CTRL-Q' keys or to exit this mission press the 'ESC' key and to pause and read the text press the 'S' key.
WVR視程内距離交戦とドッグファイト中にこれらの武器を用います。「Ctrl Q」キーを押せば、いつでも操縦を引き継げます。ミッションを終了するには「ESC」キーを、一時停止してテキストを読むには「S」キーを押します。
There are multiple drone aircraft in front of us to engage and destroy so let's have some fun! Starting with the gun, it is a six barreled 20mm rotary cannon capable of firing 6000 rounds per minute in the 'HIGH RATE' and 4000 rounds per minute in the 'LOW RATE'.
前方には複数の無人機が飛んでいて交戦や破壊が可能ですので楽しみにしていて下さい。まずは機関砲から始めましょう。これは口径20mm6砲身の回転式機関砲で「高速」の場合毎分6000発、「低速」の場合毎分4000発を発射できます。
The ammunition drum will hold 940 rounds of PGU-38 shells. We can change the firing rate by pressing the 'SHIFT-C' keys and note the change on the upper left of the PACS.
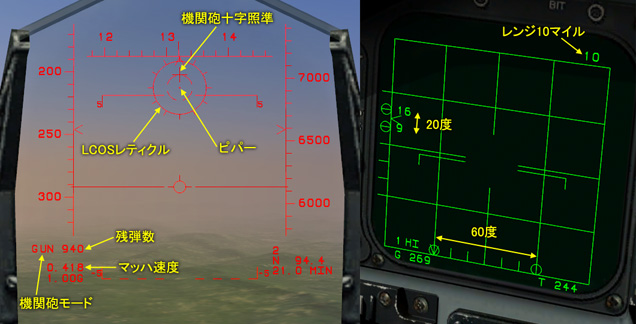
ドラム型弾倉はPGU-38弾丸を940発搭載できます。発射率は「Shift C」で切り替えができて、PACSの左上の表示が変わります。(訳注:バージョン1.1ではバグがあり、表示は変わっても実際の発射率は高速のまま切り替わらないようです。)
To bring up the gun press the '2' (Air Combat mode) and the 'C' key. Looking at the HUD, the fixed Lead Computing Optical Sight or LCOS reticule is displayed approximately one degree below the gun cross.
機関砲を選ぶには「2」キー(空対空モード)と「C」キーを押します。HUDを見ると動かないLCOSレティクル(見越し計算式光学照準)が機関砲十字照準の下約1度の場所に表示されています。
Press the ' i ' key to activate the radar. This puts us into 'Auto Acquisition Guns Steering Mode'.
「i」キーを押してレーダーを作動させます。そうすると、「自動捕捉ガンステアリングモード」になります。
At the center of the reticule is a piper and in this mode, the radar provides a scan pattern with an auto acquisition capability that ranges from 500 feet to 10 miles in range.
レティクルの中心はピパーです。このモードでは、レーダーのスキャンパターンは500フィートから10マイルまでの距離でターゲットを自動捕捉できます。
The scan pattern is 60 degrees in azimuth(30 degrees each side of center) and 20 degrees in elevation noted on the VSD. If the radar detects and locks on to a target, the HUD will automatically switch to the Lead Computing Optical Sight or LCOS, Radar Track HUD mode.
このスキャンパターンはVSDで示されるように水平60度(左右30度ずつ)と垂直20度となります。レーダーがターゲットを検知しロックした場合、HUDは自動的にLCOS(見越し計算式光学照準)レーダー追尾HUDモードに切り替わります。
There is the target ahead and now we have to fly to within 60 degrees and the radar should auto-lock.
前方にターゲットがいますから、60度以内に入るように飛行すればレーダーが自動ロックするはずです。(訳注:ロックするとレーダーはSTTモードに移行します。)
Now the radar has automatically locked the target and we see the TD box, range scale and the active LCOS reticule.
レーダーがターゲットを自動的にロックし、TDボックスと距離計、動くLCOSレティクルが表示されました。
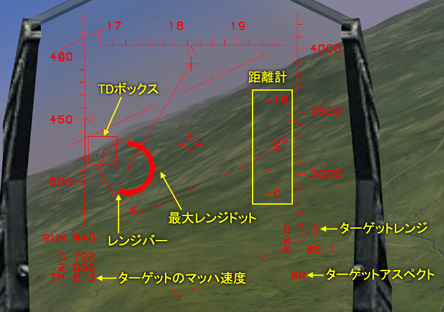
Below the altitude tape we also see the target range and aspect angle, 'T' for Tail-on.
高度目盛りの下にターゲットレンジとアスペクトアングルも表示されています。「T」は、相手の背後に付いたテイルオン状態を示します。
Now we keep maneuvering to place the LCOS piper on the target and ensure we are in-range by reducing the distance so the range bar tab is inside the maximum range dot on the outside of the LCOS reticule.
LCOSピパーがターゲットに重なるように操縦し続け、距離を詰めて、LCOSレティクル外側のレンジバーの端が最大レンジドットの内側になり射程内なのを確認します。(訳注:レンジバーは1周で12,000フィート(約2マイル)で、最大レンジドットは約3,000フィート(約0.5マイル)の所にあります。)
Using the 'SPACEBAR' key to fire, 'GUNS, GUNS, GUNS!'
「スペース」キーで発射します。「ガンズ、ガンズ、ガンズ!」
Splash 1!
1機撃墜!
When using the gun always use short bursts and most of all be patient to ensure your valuable rounds are on target.
機関砲を使うときは短時間の射撃を心がけ、なにより、貴重な弾丸が確実にターゲットに当たるよう慎重になってください。
That's the gun and now it's time to learn how to employ the AIM-9M Sidewinder in it's various non-radar modes.
これで機関砲は終わりにして、次に幾つかの非レーダーモードでのAIM-9Mサイドワインダーの使い方を学びましょう。(訳注:レーダーがオンでもSTTモードになっていない限り、非レーダーモードで動作します。)
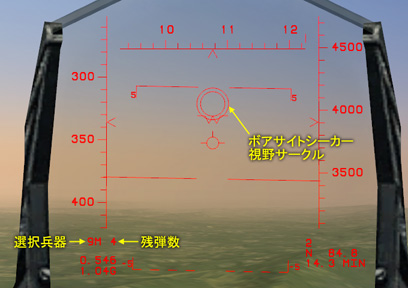
We activate the Boresight mode by pressing the '6' key and note 'RDY 9M' on the PACS.
「6」キーを押してボアサイトモードを作動させ、PACSに「RDY 9M」と表示されているのを確認します。(訳注:HUDには「9M」と表示されます。)
The HUD now displays the boresight seeker field of view with the growl tone. We must now fly the jet to place the FOV circle on the target.
するとHUDはボアサイトシーカーの視野を表示し、うなるような音が鳴ります。そうしたらターゲット上に視野サークルが重なるように飛行します。
The AIM-9M Sidewinder is a supersonic all aspect infrared guided heat seeking short range missile and will be your primary weapon for dogfight situations.
AIM-9Mサイドワインダーは超音速全方位赤外線誘導短距離ミサイルで、ドッグファイト状態で一番に使われる武器となるはずです。
Now that we have a good tone we can fire the Sidewinder, using the 'SPACEBAR' key to fire, 'Fox 2! .................................. Splash 2!
甲高いロック信号音が鳴っていますから、サイドワインダーを発射できます。「Enter」キーで発射します。フォックス2!・・・・2機目撃墜!
Next is the AIM-9 Scan Mode which we select by again pressing the '6' key and again, note 'RDY 9M' and the 'SCAN' boxed on the PACS.
次はAIM-9スキャンモードです。もう一度「6」キーを押してこのモードを選びます。PACSに「RDY 9M」と四角で囲まれた「SCAN」が表示されます。(訳注:スキャンモードがデフォルトのモードです。)
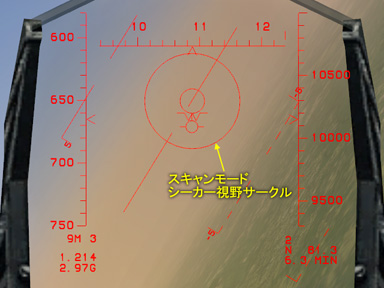
This is another non-radar mode but look at the FOV circle on the HUD, it is displaying the field of view for the uncaged seeker rather then just the boresight in the previous mode.
これがもうひとつの非レーダーモードです。HUD上の視野サークルを見ると、さっきのモードではボアサイトだけだったのが今度はアンケージされたシーカーの視野が表示されています。
In this mode the seeker is searching the area within it's gimbal limits so acquiring and maintaining a lock is much easier for the seeker. Again, we fly the jet to place the target inside the FOV circle and wait for a good tone.
このモードではシーカーがその可動範囲全体を探知してくれるので、より簡単にターゲット捕捉とロック状態の維持が行なえます。今回も、ターゲットが視野サークルの中に入るように飛行して、良好なロック信号音を待ちます。
Using the 'SPACEBAR' key to fire, 'Fox 2!' ....
「Enter」キーで発射します。フォックス2!・・・
Splash 3!
3機目撃墜!
This concludes the gun and AIM-9 training mission there are two more Sidewinders on board the jet and there is one more target ahead for you to engage as you see fit. Press the 'CTRL-Q' keys to take control or the 'ESC' key to exit. You have control.
これで機関砲とAIM-9の訓練ミッションを終了します。機体にはまだ2発のサイドワインダーが搭載されていますし、前方にはターゲットが何機か飛行していますから、その気があれば交戦可能です。「Ctrl Q」キーで操縦を引き継ぐか、「ESC」キーで終了してください。操縦を任せます。
<以上>