F-15C:AIM-120/AIM-7自動捕捉モードとジャマー追尾モード
Welcome to the within visual range training mission in the F-15C Eagle. In this flight you will learn how to use the AN/APG-63's Auto Acquisition modes with the AIM-120 AMRAAM and the AIM-9 Sidewinder.
F-15Cイーグルの視程内距離訓練ミッションにようこそ。このフライトでは、AIM-120 AMRAAMやAIM-9サイドワンダーを用いたAN/APG-63の自動捕捉モードの使用法を学びます。
You will also learn how to employ the AIM-120 in visual mode, the AIM-7 in Flood mode, and how to use both the AMRAAM and Sparrow passively in the Home on Jam mode.
また、ビジュアルモードのAIM-120とフラッドモードのAIM-7の運用方法、そしてAMRAAMとスパローをジャマー追尾モードで受動的に使う方法も学びます。
To take control of the aircraft at any time, press the 'CTRL-Q' keys. To exit this mission press the 'ESC' key and to pause at anytime to read the text press the 'S' key.
「Ctrl Q」キーを押せば、いつでも操縦を引き継げます。ミッションを終了するには「ESC」キーを、一時停止してテキストを読むには「S」キーを押します。
We have multiple aircraft in front of us to home our skills on using these very useful modes.
前方に複数の航空機があり、これらの便利なモードを使う腕を磨く事ができます。
The APG-63 has 3 Auto Acquisition modes, they are the Guns Steering mode which we have already seen, Radar Boresight mode, and the Vertical Scan mode which are able to automatically lock up targets within 10 miles range.
APG-63には3つの自動捕捉モードがあります。既に学んだガンステアリングモードに加え、レーダーボアサイトモード、バーティカル(垂直)スキャンモードがあり、10マイル以内のターゲットを自動的にロックする事が可能です。
We'll start with the Boresight AACQ mode which is useful for quickly engaging targets in our front quarter. To activate the Boresight mode, press the '4' key. Activating this mode brings up an AMRAAM, turns on the radar and sets the antenna scan along the radar bore line.
まずボアサイト自動捕捉モードから始めましょう。このモードは正面のターゲットを素早く攻撃するのに便利です。ボアサイトモードを起動するには「4」キーを押します。このモードを起動するとAMRAAMが選択され、レーダーがオンになり、アンテナスキャンがレーダーの前後軸線(ボアライン)に沿ってセットされます。(訳注:どの兵器が選択されるかは搭載状況によります。レーダーは自動的にオンになります。)

On the HUD we see the boresight reference circle and now we maneuver the jet to place the target into the circle within 10 miles and the radar will automatically lock it up.
HUD上にボアサイトレファレンスサークルが現れるので、距離10マイル以内でサークル内にターゲットが入るように飛行すれば自動的にロックされます。
There we go, he's locked and we see the Target designation box and we can fire.
見てください。敵はロックされTDターゲット指示ボックスが現れ、発射可能になりました。(訳注:ロックするとSTTモードになります。)
Using the 'SPACEBAR' key to fire, Fox 3!
「Enter」キーで発射します。フォックス3!
Splash 1! We can use the AACQ modes with any of our air to air missiles.
1機撃墜!これらの自動捕捉モードは全ての空対空ミサイルに対して使用できます。
Next is the Vertical Scan Auto Acquisition mode which we use primarily while we are in a situation where we are performing hard turning maneuvers or in a dogfight. We activate the Vertical Scan AACQ mode by pressing the '3' key and the 'D' key to bring an AIM-9 online.
次はバーティカルスキャン自動捕捉モードで、主に急旋回機動中つまりドッグファイト中に使用されます。「3」キーを押してバーティカルスキャン自動捕捉モードを作動させ「D」キーでAIM-9を選びます。
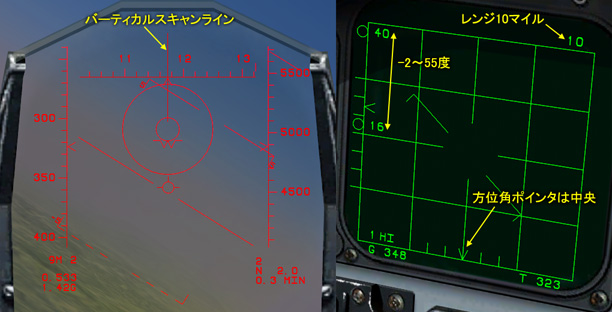
The radar is on and the antenna is now scanning from 5 to 55 degrees vertically and 7.5 degrees in azimuth as noted on the VSD.
レーダーが(自動的に)オンになり、VSDで示されるようにアンテナが垂直方向は-2〜55度を、水平方向は7.5度をスキャンしています。(訳注:原文の誤りを修正しました。)
On the HUD we see the AIM-9 reference circle with a vertical line extending to the top of the HUD indicating this mode. This scan pattern is designed to lock up targets that are above the HUD and directly in line with our velocity vector.
HUD上には、垂直のラインが上部に向けて伸びたAIM-9のレファレンスサークルが表示され、このモードだと分かります。このスキャンパターンは、HUDより上方で自機の速度ベクトルに一致しているターゲットをロックするように設計されています。
We are merging with a fast moving F-4 Phantom so let's mix it up with him and get into a turning fight. Press 'Alt-R' to jettison tank for prepare dogfight.
高速のF-4ファントムと合流しようとしています。敵を旋回戦に引き込みましょう。「Alt R」を押して燃料タンクを投棄しドッグファイトに備えます。
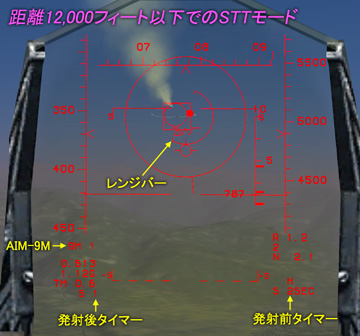
There is the lock and tone, using the 'SPACEBAR' key to fire, Fox 2! Splash 2!
ロックできたので信号音が鳴っています。「Enter」キーで発射します。フォックス2!2機目撃墜!(訳注:ロックするとSTTモードになります。AIM-9の場合、ターゲットの距離が12,000フィート(約2マイル)以下になるとHUDに円形のレンジバーが表示されます。)
For our next target we will use the AIM-120 AMRAAM in the visual mode. To activate this mode press the '6' key and the 'D' key.
次のターゲットに対してはビジュアルモードのAIM-120 AMRAAMを用います。このモードを起動するには「6」キーと「D」キーを押します。(訳注:「6」を押さなくても、ターゲットをロックしていなければ自動的にビジュアルモードになります。ミサイルのレーダーが作動してしまうので相手に気付かれたくない場合は注意が必要です。)
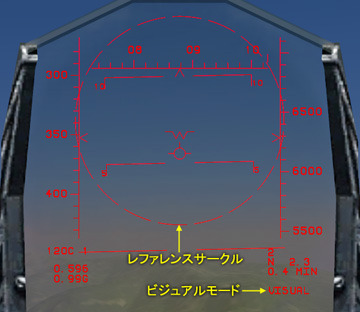
The AMRAAM is brought up, the radar is off and on the HUD we see the 12 degree dashed reference circle and the word 'VISUAL' is displayed under the altitude tape. In this mode the AIM-120 will use it's on board radar to lock any target within 15 miles.
AMRAAMが選択され、レーダーはオフで、HUD上に直径12度の点線状のレファレンスサークルと高度目盛りの下に「VISUAL」の文字が表示されます。このモードではAIM-120に内蔵されたレーダーが使用され15マイル以内のターゲットがロックされます。(訳注:機体のレーダーは自動的にオフにはなりません。複数の機体がある場合は近い方を、距離が同じ場合はレーダー反射が大きな方をロックします。)
Now I'll maneuver the jet to place the target within the reference circle and using the 'SPACEBAR' key to fire, Fox 3!
ターゲットをレファレンスサークル内に入るように飛行し「Enter」キーで発射します。フォックス3!
Splash 3 from the Visual Slammer!
ビジュアルモードのAMRAAMで3機目撃墜!
I have to act quickly here so I'll activate the AIM-7 Flood mode by pressing the '6' key and the 'D' key. Using the 'SPACEBAR' key to fire, 'Fox 1!'
ここは素早く行動しなければなりません。AIM-7を選んで「6」キーと「D」キーを押しAIM-7のフラッドモードを作動させます。「Enter」キーで発射します。フォックス1!
Splash 4 from the Flood Sparrow!
フラッドモードのスパローで4機目撃墜!
Now let's consider the Flood mode. On the HUD we saw the solid 12 degree reference circle and the word 'FLOOD' on the VSD.
フラッドモードを詳しく説明しましょう。HUD上には12度のレファレンスサークルが、VSDには「FLOOD」の文字が表示されます。

When in FLOOD mode the radar is providing illumination within the reference circle and you do not have to acquire a lock on the target in this mode.
フラッドモードではレーダーはレファレンスサークル全体を照射するので、ターゲットにロックする必要はありません。(訳注:レーダーは自動的にオンになります。複数の機体がある場合、ミサイルはレーダー反射が最も大きなターゲットを追尾します。)
You fly the jet to place the target within the reference circle and fire. You must keep the target within the reference circle for the entire duration of the missile's flight or it will lose lock and go ballistic.
ターゲットがレファレンスサークル内に入るように飛行し発射します。ミサイルが飛行中はずっとターゲットをレファレンスサークル内に入れておく必要があります。そうしないとミサイルはロックが外れ勝手に飛んで行ってしまいます。
Ok, now I'll bring up an AIM-7 and with the radar on and no target locked we are in the Relaxed mode indicted by the 8 degree reference circle on the HUD but we can't target or engage anything in the relaxed mode.
今度は、(フラッドモード以外の場合に)レーダーオンでターゲットをロックしていない状態でAIM-7を選びます。するとリラックス(待機)モードになり、HUD上に8度のレファレンスサークルが表示されます。リラックスモードでは敵の捕捉や攻撃はできません。(訳注:レーダーオフでもリラックスモードになります。)

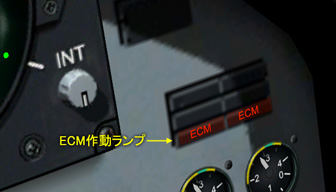
We are getting painted up by an MiG-29S Fulcrum C. I'll activate the onboard ECM jammer by pressing the 'E' key.
MiG-29SファルクラムCによってレーダー照射されています。「E」キーを押して機内搭載のECMジャマーを作動させます。
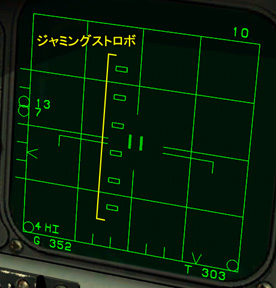
The final mode you will learn today is the AIM-120 and AIM-7 Home On Jam mode. This mode is used to engage targets that are actively jamming your radar which is represented by jamming strobes on the VSD.
今日最後に学ぶのはAIM-120とAIM-7のジャマー追尾(HOJホームオンジャム)モードです。このモードはVSD上ではジャミングストロボとして表示されるアクティブなレーダー妨害を行なうターゲットを攻撃します。
There are the strobes and because of the jamming we can't get a radar lock on it. Thankfully a built in feature of both the AMRAAM and the Sparrow is the ability for the missile to passively lock and track the energy emitted by the enemy aircraft's jammer.
ストロボが見えますが、ジャミングのためにレーダーをロックする事ができません。ありがたい事にAMRAAMとスパローは、敵機のジャマーの放出エネルギーを受動的にロックし追尾する機能が組み込まれています。
With the AIM-7 on line I'll slew the TDC over any one of the jamming strobes and press the 'TAB' key to lock. Now we see the solid line through all the strobes and the 'HOJ' symbol on the VSD.
AIM-7を選びTDCをジャミングストロボの1つに重ね「Tab」キーでロックします。するとVSD上のストロボ全体を貫く実線と「HOJ」の文字が表示されます。(訳注:相手にはロック警告が出ます。)
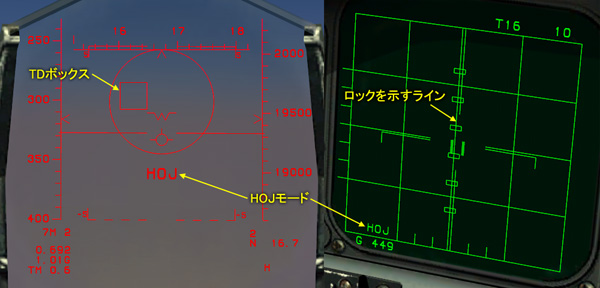
'HOJ' is also displayed on the HUD and once we feel the target is within range we can fire.
HUD上にも「HOJ」の文字が表示されます。射程内に入ったと思ったら発射可能です。
Fox 1!
フォックス1!
Unfortunaly, radar can't calculate the distance to target in HOJ mode. So, it is possible to make a mistake when we launch.
残念ながら、HOJジャマー追尾モードではターゲットの距離を算出できません。ですから、不適切な条件で発射してしまう可能性もあります。(訳注:AWACSが飛んでいる場合は、問い合わせれば情報が得られるかもしれません。また敵がレーダーを使用していればTEWSの表示が参考になります。)
There is a short in this case...
今回は射程が足りませんでした・・・。(訳注:トラックでは結局命中しています。再生の誤差だと思われます。)
Radar burnt wrong of Fulcrum's ECM and locked the target.
レーダーがファルクラムのECM妨害を突破しターゲットをロックしました。(訳注:距離約15マイルでECMを突破できます。突破するとHOJモードは自動的にSTTモードに切り替わります。)
Now we can see target's range and we should launch. Fox 1!
ターゲットの距離が分かり(十分近いので)発射すべきです。フォックス1!
Splash 5!
5機目撃墜!
The missile track passively in Home On Jam mode as long as the target is actively jamming, when the target will disable ECM, the missile will change mode to active (AMRAAM) or semi active (Sparrow) mode.
ジャマー追尾モードでは、ターゲットがアクティブにジャミングしている間はミサイルは受動的に追尾します。ターゲットがECMを切ると、ミサイルはアクティブ(AMRAAMの場合)か、セミアクティブ(スパローの場合)モードに移行します。
Remember this because you will be actively jamming other aircraft at times and you will also be vulnerable to the enemy's Home on Jam weapons.
ですから、あなたが他の航空機をアクティブにジャミングしていると、敵のジャマー追尾タイプの兵器で狙われる危険性があるので気を付けてください。
We are now heading for the IP at Sukhumi and I think 5 kills for day's work is quite enough. To fly this training mission yourself, press the 'ESC' key to exit and then restart this mission and press the 'CTRL-Q' keys to take control once it has started playing.
Sukhumi飛行場への進入点に向かっています。1日に5機も撃墜すればもう十分でしょう。自分でこの訓練ミッションを飛びたい場合は、「ESC」キーで一旦終了し、このミッションを再スタートし再生が開始したら「Ctrl Q」キーで操縦を引き継いでください。
※訳者的まとめ:
BVRモードでTDCカーソルを使ってターゲットをロックする場合、比較的長い時間VSDに視線を落とさなければなりません。これは敵と接近した緊迫した状況では避けたい行動です。
ここで説明されたモードは、ジャマー追尾モードを除いてHUDから目を離さずにロックや攻撃を行なう事ができます。
ボアサイトモードとバーティカルスキャンモード(及びガンステアリングモード)はレーダー照射範囲を固定し、敵をその中に入れる事で自動的にロックできます。ロックした後はSTTモードとなります。注意すべき点は10マイル以内でしか使えない事です。ボアサイトモードは正面に敵がいる場合、バーティカルスキャンモードは旋回中に使う事になるでしょう。
一方でロックせずに発射するのがAIM-120のビジュアルモードとAIM-7のフラッドモードです。ミサイルがターゲットを捕らえているのか、そしてターゲットが射程内なのかはパイロットが目視で判断する事になります。レーダーロックを待てないような咄嗟の状況以外ではあまり使わないでしょう。AIM-120はレーダーロックしていない限りビジュアルモードです。一方AIM-7をフラッドモードにするにはきちんと切り替える必要があります。
ジャマー追尾モードもターゲットの距離がレーダーでは分かりませんから、ターゲットが射程内にいるのかは目視やAWACS、TEWSの情報等で判断する事になります。
「2」キー:
BVRモード
「3」キー:
バーティカルスキャンモード
「4」キー:
ボアサイトモード
「6」キー:
レーダーロックを必要としないモード
AIM-7フラッドモード
AIM-120ビジュアルモード
AIM-9スキャンモード
AIM-9ボアサイトモード
「C」キー:
ガンステアリングモード
<以上>