Su-27:導入と航法、ILSアプローチ
Comrade, welcome to your first flight in the Sukhoi Su-27 Flanker B! The Su-27, Russia's frontline air superiority fighter is not only one of the most beautiful aircraft but it is also one of the most lethal. Please have the HUD set to display Russian in the options.
同志よ、スホーイSu-27フランカーBでの初飛行にようこそ!ロシアの第一線の制空戦闘機であるSu-27は、最も美しい航空機のひとつであるだけでなく最も殺傷力の高い戦闘機でもあります。オプションでHUD表示をロシア語にしておいてください。
The Flanker is an all weather day/night air superiority fighter aircraft powered by two powerful Lyulka Saturn AL-31F afterburning turbofan engines each rated at 12,500 KG static thrust and is capable of reaching 2500 km/h or Mach 2.35 with a service ceiling of 18,500 meters.
フランカーは全天候昼夜間運用可能な制空戦闘機で、1基当たりの静止推力が12,500KgとされるLyulka Saturn社製AL-31Fアフターバーナー付きターボファンエンジンを2基搭載しています。そして最高速度2500km/hつまりマッハ2.35で実用上昇限度18,500メートルという能力を有しています。
The Flanker is a graceful swan with the talons of a bird of prey and a joy to fly. To take control at anytime press the 'CTRL-Q' keys or to exit this mission press the 'ESC' key.
フランカーは猛禽類の爪を持つ優美な白鳥であり、飛ばすのが楽しい機体です。「Ctrl Q」キーを押せば、いつでも操縦を引き継げます。ミッションを終了するには「ESC」キーを押します。
In this flight you will learn about the HUD, the instrument panel gauges, and how to navigate using those instruments to conduct a safe approach landing in miserable weather conditions.
この飛行ではHUDと計器盤の各計器、それらの計器を使った航法とそれによる悪天候時の安全な進入着陸に関して学びます。
Before we begin the NAV and ILS training we will first learn the information that the Head Up Display or HUD provides us.
航法とILSの訓練を始める前に、まずHUDヘッドアップディスプレイから得られる情報に関して学びます。
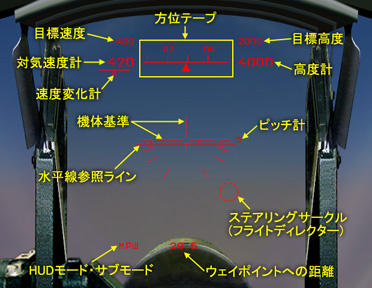
In the center of the HUD is the aircraft datum and the horizon reference line which is a duplicate of the attitude indication gauge on the main panel. The aircraft datum is a miniature aircraft and we must visualize that we are looking at it from directly behind it.
HUDの中央は機体基準と水平線参照ラインで、主計器盤の姿勢指示器と同じものです。機体基準はミニチュアの機体で真後ろからそれを見ていると考えてください。
As the aircraft rolls and banks the datum will also roll and bank in unison which shows us what bank attitude we are in even if we can't see the ground or the outside horizon, as well, it will go completely inverted if the aircraft is inverted.
機体がロールしバンク(傾斜)すると機体基準も同時にロールしバンクします。それによって地面や外の水平線が見えなくても機体のバンク姿勢が分かります。もしも機体が反転したときは機体基準も完全にひっくり返ります。
Below the horizon line are angled lines that show from wings level through increasing bank angles of 0, 5, 10, 15, 30, and 60 degrees. The horizon line remains stationary and the datum will rise above or below it as the aircraft's nose rises above or below the true horizon.
水平線の下には複数の傾いたラインがあり、バンク角を水平から順に0、5、10、15、30、60度まで示します。機体の機首が水平線より上や下を向いた場合は、機体基準はそのままで水平線参照ラインが上下に動きます。(訳注:原文の誤りを修正しました。)
There is also a numerical pitch indicator to the right side of the horizon line that will show how many degrees of pitch the nose is above or below the horizon with a negative number representing a negative pitch or nose low attitude.
また水平線の右側には数値表示のピッチ計があり、水平線に対する機首ピッチの角度を示します。マイナスの場合はマイナスピッチつまり機首下げ姿勢を表します。
In the upper left corner of the HUD is the airspeed readout which is displayed in kilometers per hour and gives us our aircraft's airspeed.The triangle below shows if the plane accelerates or decelerates.
HUDの左上は対気速度計で、機体の対気速度を毎時キロメートルで表示します。その下の三角マークは機体が加速や減速をしているかを示します。
To the right of the airspeed readout is the heading tape which displays the aircraft's magnetic heading as a scrolling tape with the solid triangle indicating the current heading.
対気速度計の右は方位テープで、回転するテープと現在の方位を指す三角マークによって機体の磁方位を示します。
Continuing to the right is the altitude readout which displays the aircraft's altitude above sea level, or barometric altitude.
さらに右は高度計で、機体の海抜高度つまり気圧高度を表示します。(訳注:対地高度が1500m以下の場合、数値の横に「p」が表示され対地高度を示します。)
On the bottom left is the HUD mode/sub-mode indication.
左下はHUDモード・サブモード表示です。
The steering circle in the center is the flight director showing us the way to the next waypoint. It's a very smart system that can help you even to intercept course. Just follow the circle. Using the HUD alone we can fly the aircraft in control without any outside visual references.
中央のステアリングサークルはフライトディレクターで次のウェイポイントへの方向を示します。とても賢いシステムなのでコースに合流できるように補助までしてくれます。サークルを追いかけるだけで良いのです。HUDのみを使って外部の視界情報に頼らずに機体をコントロールすることが可能です。
Now we will move down to the main instrument panel. We will start with the 5 basic flight instruments.
それでは視線を下げて主計器盤へ移りましょう。5つの基本飛行計器から始めます。
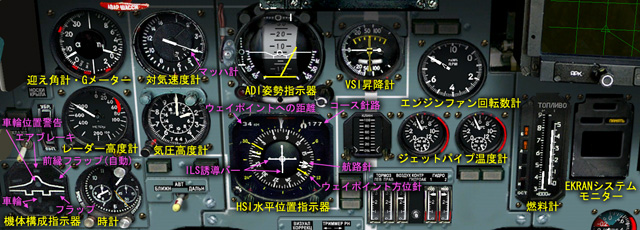
The first is the ADI or Attitude Direction Indicator which is the primary instrument of the 5. It is an artificial horizon which displays the aircraft's pitch and bank angles. It is identical to the ADI in the Su-25 so I won't go over it here.
最初はADI姿勢指示器で、5つの内で一番大事な計器です。人工水平儀が機体のピッチとバンク角を表示します。これはSu-25のADIと同じなので説明は省略します。
Next is the HSI or Horizontal Situation Indicator. It is very similar to the HSI in the Su-25.
次はHSI水平位置指示器です。これはSu-25のHSIとよく似ています。
On the compass ring are 2 needles, the yellow bearing needle, which always points in the direction of the selected waypoint and the white double arrow is always oriented to the required course to the waypoint.
コンパスリングの上に2本の針があります。黄色い方位針は常に選択したウェイポイントの方向を指し、白い二重の矢印(航路針)はウェイポイントへ向かう所要コースの向きになっています。(訳注:ここでの「コース」とは通過したウェイポイントと次のウェイポイントを結ぶ直線航路です。)
The digital number on the upper left shows the distance to the waypoint while the digital readout on the upper right shows the required course.
左上の数値表示はウェイポイントへの距離を示し、右上の数値表示は所要コースの方位を示します。
When both needles are pointing up, you are on course heading to the waypoint. Displayed in the center of the HSI are the ILS localizer and glideslope guidance bars which are used when conducting an instrument landing.
2本の針が真上を向いていれば、コース上をウェイポイントに向かって飛行している事になります。HSIの中央はILSローカライザーとグライドスロープの誘導バーで、計器着陸を行う時に使用します。
Next is the airspeed indicator which shows indicated airspeed. This gauge has a fixed airspeed scale graduated from 100 to 1600 km/h and an internal Mach scale.
次は対気速度計で、指示対気速度を示します。この計器は100km/hから1600km/hまでの固定された文字盤があり、内側にマッハ計があります。
Below it is the barometric altimeter which displays the aircraft's altitude above mean sea level at all times with an outer scale and needle indicating altitude in 100m increments to 1000m and small inner scale and needle showing altitude in 1000m increments to 30,000m. Adding the 2 scales together will give your current altitude above sea level.
その下は気圧高度計で、機体の海抜高度を常に表示します。外側の文字盤と針は100m刻みで1000mまでの高度を示し、内側の小さな文字盤と針が1000m刻みで30,000mまでの高度を示します。2つの数値を足すことで海抜高度が分かります。(訳注:外側は高度の下3桁だけを示します。)
The last of the 5 is the Variometer which is identical in the Su-25 so I won't go over it here.
5つの基本計器の最後は昇降計で、Su-25のものと同じなので説明は省きます。
Additional instruments are the combined Angle of Attack/G meter. The AOA range is from zero to 40 degrees with the red mark indicating maximum operational angle of attack of 25 degrees alpha. The G meter scale is from negative 4 to positive 10 Gs.
補助的な計器として迎え角とGメーターの複合計器があります。迎え角(AOA)の範囲はゼロから40度までで、赤い印はアルファ25度の最大運用迎え角を示します。Gメーターはマイナス4Gからプラス10Gまでを示します。
Below the AOA/G gauge is the radar altimeter which displays the aircraft's altitude above ground ranging from zero to 1500 meters when the wings are in a 45 degree bank or less.
迎え角/Gメーターの下はレーダー高度計で、バンクが45度以下の時に地表からの機体高度をゼロから1500メートルの範囲で表示します。(訳注:機体の真下方向の地表までの距離なので、機体が傾くと数値が大きくなります。)
Below the RADALT is a clock similar to the one in the Su-25 and to the left is the aircraft configuration display.
RADALTレーダー高度計の下は時計でSu-25のものと似ています。その左は機体構成指示器です。
Next on the right of the variometer is the dual needle engine N1 fan RPM gauge which indicates the engine speed as a percentage of maximum RPM for both the left and right engines with '10' indicating 100% military thrust.
次は昇降計の右にあるエンジンN1ファンRPM(回転数)計で、2本の針があり左右のエンジンのエンジンスピードを最大RPMに対するパーセントで表示します。数値「10」は100%のミリタリー推力を示します。
Below the RPM gauge are the two jet pipe temperature gauges which indicate the temperature of the gases at the turbine exhaust. The large scale reads Celsius in 100 degrees increments up to 1000 and the inner in scale in 10 degree increments to 100 degrees. Exact temperature is read by combining the 2 scales.
RPM計の下は2つのジェットパイプ温度計で、タービン排気部分でのガスの温度を示します。大きな数字の表記は摂氏温度を100度刻みで1000度まで示し、内側が10度刻みで100度までを表示します。正確な温度は2つの目盛りを組み合わせて読み取ります。(訳注:内側は温度の下2桁だけを示します。)
To the right of the temp gauges is the Fuel gauge which shows the remaining fuel in the internal tanks measured in 1000 KG increments to 10,000 KG total and finally, to the right, is the EKRAN systems monitor.
温度計の右は燃料計で、機内搭載燃料タンクの残燃料の量を1000kg単位で合計10,000kgまで示します。そして最後はその右のEKRANシステムモニターです。
Now that we know how to interpret data from the HUD and instrument panel it's time to use it to navigate a series of waypoints. There are 4 navigation modes in the Flanker and they are cycled by pressing the '1' key.
さて、HUDと計器盤の読み取り方を知ったので、複数のウェイポイントへ機体を誘導するのにその知識を使ってみましょう。フランカーには4つの航法モードがあり、「1」キーを押すことで切り替えられます。
The first is the basic Pilot mode indicated by 'HAB' on the bottom right of the HUD. This sub-mode is used for free flight and doesn't provide any navigation information regarding your programmed flight plan.
最初は基本パイロットモードでHUDのモード表示は消えます。このサブモードはフリーフライトで使用され、設定したフライトプランに関する航法情報は表示されません。(訳注:原文の誤りを修正しました。)
The second sub-mode is the Enroute mode indicated by, 'MAPW' and this the primary navigation mode you will use when following a flight plan. Note the required speed and altitude on the top of the HUD. You can cycle the waypoints with the '~TILDE' key.
2番目のサブモードは航路モードで「МРШ」で示されます。(訳注:英語表記は「ENR」です。)これが主要な航法モードでフライトプランに沿って飛行するときに使用します。目標の速度と高度がHUDの一番上に表示されていることに注意してください。ウェイポイントは「~」キーで切り替えができます。(訳注:「~」キーは日本語キーボードでは入力できません。)
The third sub-mode is the Return mode indicated by 'BO3B' which will automatically select the initial approach fix of the airport you have designated to land at in your flight plan. You can cycle all the airports with the '~TILDE' key.
3番目のサブモードは帰還モードで「ВЗВ」で示され、自動的にフライトプランで着陸指定した飛行場の初期進入フィックスがウェイポイントとして選択されます。(訳注:英語表記は「RTN」です。)「~」キーで全ての飛行場に対する切り替えができます。
The final NAV mode is the ILS mode indicated by 'NOC' which will automatically select the final approach fix of the airport you have designated to land at in your flight plan, as well, all the airports can be cycled with the '~TILDE' key.
最後の航法モードはILSモードで「ПОС」で示され、自動的にフライトプランで着陸指定した飛行場の最終進入フィックスが選択されます。(訳注:英語表記は「LNDG」です。)先程と同じように「~」キーで全ての飛行場に対する切り替えができます。
We are currently heading away from waypoint 2 above of an overcast layer, level at 4000 meters.
現在ウェイポイント2を通過し、全天を覆う雲の上を高度4000メートルで水平飛行しています。
The NAV computer and flight director are now calling for waypoint 3 and notice on the HUD the required airspeed above the indicated airspeed and the required altitude above the true altitude.
航法コンピュータとフライトディレクターがウェイポイント3への指示を出しています。HUD上の指示対気速度の上に目標対気速度が、実際の高度の上に目標高度が表示されています。
The bearing needle is now pointing to the right of the course needle at waypoint 3 and the course needle is set for the required course of '177'.
方位針は航路針に対し右側のウェイポイント3を指しており、航路針は所要コース「177」を指しています。
I'll start the turn on course.
コース上へ向けて旋回を始めます。
Now we're intercepting the course heading for waypoint 3.
ウェイポイント3へ向かうコースに合流します。
I want to get to the airport quickly so I'll press the '1' to enter the 'Return' NAV mode indicated by 'B03B' on the HUD. The bearing needle is pointing to the IAF so I'll start the 40 degree turn right to align with the bearing needle.
早目に飛行場に向かいたいので「1」キーを押してHUD上で「ВЗВ」と表示される「帰還」航法モードに移行します。方位針はIAF初期進入フィックスへの方位を指していますから、方位針の方向に機首を向けるために40度の右旋回を始めます。
Since we want to go direct to the IAF, we don't need to intercept the course and can fly direct to the IAF by turning to get the bearing needle to the top of the HSI and the HUD steering circle to the middle of the HUD.
IAFに直接向かうつもりなので、コースに合流する必要はなく、方位針がHSIの真上になりHUDステアリングサークルがHUDの中央に来るように旋回して直接IAFに飛行します。
The NAV computer and flight director are calling for a climb to 4520 meters but since we are already below it and within 40 km from the IAF, it is not practical to make a climb at this time.
航法コンピュータとフライトディレクターが4520メートルへの上昇を指示していますが、既に低い高度にいる上にIAFから40km圏内に来ているので、ここでわざわざ上昇する必要はないでしょう。
The NAV computer and flight director are now calling for a slight descent to 1820 meters but again, it is not practical at this time.
航法コンピュータとフライトディレクターが1820メートルへの僅かな降下を指示していますが、この場合も従う必要はないでしょう。(訳注:トラック中では指示に従っています。)
The NAV computer is now calling for a descent to our final altitude before ILS intercept so I'll start descending to 1020 meters.
今度は航法コンピュータがILSへの合流に向けての最終高度への降下を指示しています。これに従い1020メートルへの降下を始めます。
We are on course for the IAF. Since the weather is very poor tonight I want to make sure I start slowing down the jet early to prepare for a stabilized approach.
IAFへのコースに乗っています。今夜は天候が非常に悪いので、安定したアプローチに備えて忘れずに早目の減速を始めます。
We are approaching the IAF so I'll put the landing gear down pressing 'G' key as indicated on the configuration display.Flaps extend automatically.
IAFに接近してきたので、「G」キーで車輪を降ろします。機体構成指示器にその表示が出ます。フラップが自動的に下がります。
Just prior to reaching the IAF, the NAV computer has switched to 'Landing' mode indicated by the 'NOC' on the HUD. I'll turn to intercept the localizer course of '219'.
IAFを通過する直前になると、航法コンピュータが「着陸」モードに切り替わりHUDに「ПОС」が表示されます。旋回して方位「219」のローカライザーコースに合流します。
The ILS guidance bars are now active indicating we are within the reception range of the ILS radio signals.
ILS誘導バーが動き始めたので、ILS電波の受信範囲に入ったことが分かります。(訳注:HUDには小さな丸印のILS誘導マークが表示されます。これはバー表示の時のバーの交点に相当します。マークが機体基準の中央に重なれば着陸コースに乗っている事になります。また、ILS電波受信中は、それを示す2つのマークがHUDに表示されます。)
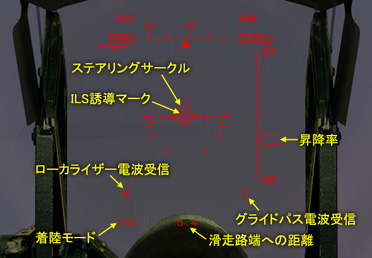
I'll set about 75-80% N1 and follow the glideslope down at 5 meters/second and at about 320-340 km/h.
推力を75〜80%N1程度にセットし、速度320〜340km/h、降下率5m/sでグライドスロープに沿って降下します。
When on an ILS is when we want to rely on the HUD steering circle the most. I'll maneuver the jet to place the center of the aircraft datum within the steering circle and hold it there. The steering circle will provide accurate guidance down the ILS.
ILSに従う場合はHUDのステアリングサークルを最も頼りにします。機体基準の中心がステアリングサークルの中に留まるように機体を操作します。ステアリングサークルがILSに沿った正確な誘導をしてくれます。(訳注:ステアリングサークルはズレに対して敏感に反応するので、ILS誘導マークも参考にして過剰な操舵にならないように注意しましょう。)
While on an ILS it is imperative to make very small corrections and thrust changes to maintain a stabilized approach.
ILSに乗っている時は、安定したアプローチを維持するために微妙な姿勢修正と推力調整が欠かせません。
Ground contact and there are the approach lights! Visibility is horrible!
地表が目視可能になり滑走路の進入灯も見えます! 視界は最悪です!
Runway in sight... Continuing.
滑走路が見えました・・・引き続き降下します。
Touchdown! I'll extend the airbrake with the 'B' key, deploy the braking parachute with the 'P' key and get on the wheel brakes with the 'W' key.
タッチダウン(着地)! 「B」キーでエアブレーキを開き、「P」キーで制動用パラシュートを開き、「W」キーで車輪ブレーキを掛けます。(訳注:「W」キーは押している間だけ働きます。)
Remember, a quick way to get to a waypoint is to turn the jet until the waypoint bearing needle is pointing up and then fly to it. You won't be on course but you will get there faster.
ウェイポイントを辿る簡単な方法は、ウェイポイント方位針が真上を向くように機体を旋回させ、その方向に飛ぶことです。コース上から外れてしまいますがウェイポイントには早く到着します。
This should be enough guidance for you to navigate waypoints and conduct an ILS approach in very poor weather. To fully understand the Flanker's cockpit, please read the manual.
以上で、ウェイポイントに機体を誘導し、悪天候の中でILSアプローチを実行するのに十分な説明になったはずです。フランカーのコクピットをさらに詳しく理解するにはマニュアルを読んでください。
Don't forget that the waypoint bearing needle will always be displaced to the side of the course needle that the flight planned course is on and your intercept heading should always be to that side.
ウェイポイント方位針は航路針に対しフライトプランで設定したコースがある方向にずれます。コースに合流するための方位は常にそちら側になる、ということを忘れないで下さい。
I'll turn the taxi lights off by pressing the 'ALT-L' keys, then turn off the navigation lights by pressing the 'CTRL-L' keys.
「Alt L」キーを押してタキシング用ライトを消し、「Ctrl L」キーを押して航行灯を消します。
I'll turn the engines off by pressing the 'ALT-PAGE-DOWN' and 'SHIFT-PAGE-DOWN' keys.
「Alt End」と「Shift End」キーを押してエンジンを停止します。(訳注:原文の誤りを修正しました。「RWin End」キーで2つのエンジンを同時に停止できます。)
Using the HUD and your navigation instruments will help keep you on course and at the proper altitudes and will bring you safely to an airport for landing in all weather conditions while carrying out missions in the Su-27. Press the 'ESC' key to exit.
HUDと航法計器を使えば、Su-27でミッションを遂行しながら、コースから外れずに適切な高度で飛行し、天候に関わらず安全に飛行場に着陸することが可能になります。「ESC」キーを押して終了してください。
<以上>