Su-33:空母発艦と着艦
Welcome to the Su-33 basic carrier ops practice mission.
Su-33の空母での基礎運用訓練ミッションにようこそ。
You can take control at any time by pressing 'Ctrl-Q'.
「Ctrl Q」キーを押せばいつでも操縦を引き継げます。
Don't use the mouse, keyboard or joystick while the track is playing. Use the 'S' key to pause and resume.
トラック再生中はマウスやキーボード、ジョイスティックを使用しないで下さい。一時停止と再開には「S」キーを押して下さい。
We extend the flaps with 'Shift-F'.
「Shift F」でフラップを下げます。
Increasing engine thrust...
エンジンの推力を上げ・・・
Full afterburner!
フル・アフターバーナー!
Take off! Maintaining 20° pitch, we raise the gear by pressing the 'G' key.
発艦!ピッチ20度を維持しながら、「G」キーを押して車輪を格納します。
After the fighter accelerates, we retract the flaps with 'Ctrl-F'.
機体が十分加速したら、「Ctrl F」でフラップを上げます。
We establish horizontal flight at an altitude of 500m and airspeed 500km/h... and start the first 180° left turn with 30° angle of bank.
高度500m対気速度500km/hの水平飛行に移り・・・30度のバンク角で最初の180度左旋回を始めます。
To keep airspeed near 500km/h at low altitudes, we need about 77-82% engine RPM.
低高度で500km/h前後の対気速度を維持するには、77〜82%のエンジン回転数が必要です。
We turn onto the downwind leg.
ダウンウィンドレグに乗るよう旋回します。(訳注:ベースレグに乗るまではHDDヘッドダウンディスプレイで空母との位置関係を確認しながら飛行すると良いでしょう。)
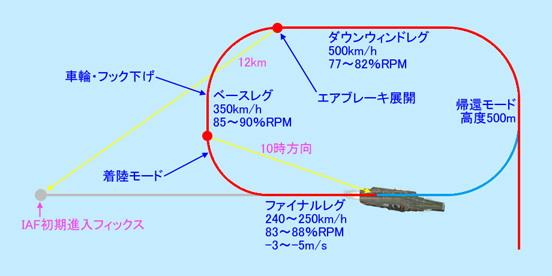
At a range of 12km, we extend the airbrake with the 'B' key and start the third (base leg) 90° left turn with a 30° bank angle.
12kmの距離で、「B」キーでエアブレーキを拡げ、30度のバンク角で(ベースレグに向けた)3度目の90度左旋回を始めます。(訳注:ここでの「12km」という距離は、帰還モードでの初期進入フィックスまでの距離で、HUD下部に表示されています。)
The base turn slows the fighter to 350km/h.
ベース旋回で機体は350km/hに減速します。
Now we maintain 350km/h by increasing the RPM to 85-90%.
そして回転数を85〜90%にして350km/hを維持します。
While pressing the 'G' key to lower the gear, the flaps are simultaneously extended to the landing position.
「G」キーで車輪を下げると、同時にフラップが着陸位置に下がります。
We lower the tail-hook with 'Ctrl-G'.
「Alt G」でテイルフック(制動フック)を下げます。(訳注:原文の誤りを修正しました。)
With the carrier at the 10 o'clock position, (as determined visually with reference to canopy details), we start the fourth 90° turn to the final leg.
(キャノピーの部品を目安に目測して)空母が10時の位置にある時に、ファイナルレグへの90度旋回を始めます。
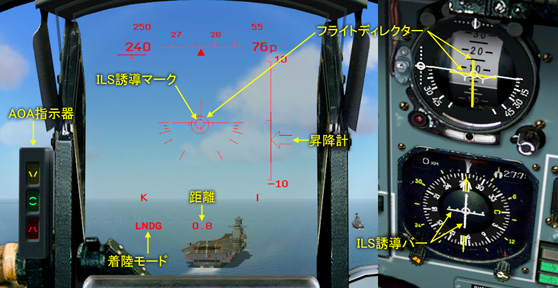
The '1' key selects the ''LNDG'' (landing) mode.
「1」キーで「LNDG」(着陸)モードを選びます。(訳注:ロシア語表記は「ПОС」です。)
We complete the final turn and establish a precise approach, using the ILS course deviation bar and ADI course director bar for guidance. When the ILS glide slope bar is centered, we descend and decelerate to 240-250km/h airspeed.
最終旋回を完了し、ILS誘導バーとADIフライトディレクターバーを頼りに正確なアプローチに移ります。ILSグライドスロープバーが中心に来たら、降下を始め対気速度240〜250km/hに減速します。(訳注:HUD上のILS誘導マークはILS誘導バーの交点のみを表示していると考えて下さい。)
For the fighter to stay on a straight glide path, the aircraft carrier should minimize crosswind by heading into the wind. (The carrier's heading needs to be set correctly beforehand by the mission designer.)
戦闘機が真っ直ぐなグライドパス(降下コース)に留まるために、空母は風の方向に向かって進み横風を最小限にすべきです。(空母の針路はミッション作成者が事前に正しく設定しなければなりません。)
We maintain the assigned airspeed (240-250km/h) with the engine RPM at about 83-88%. At the same time we maintain a vertical velocity of -3..-5m/s.
指定された対気速度(240〜250km/h)を維持するには83〜88%のエンジン回転数が必要です。同時に昇降率を-3〜-5m/sに維持します。
To the left of the HUD is the ISM-1 AoA indicator. It shows the deviation from assigned AoA on the glide path. It's very useful to help keep the assigned speed on the glide path :
YELLOW BLINKING - AoA is dangerously low; reduce the airspeed,
YELLOW - AoA is less then assigned, slightly reduce the airspeed,
YELLOW+GREEN - AoA is little bit less then assigned, adjust the airspeed,
GREEN - AoA is normal, keep the current airspeed,
RED+GREEN - AoA is little more than assigned, rise the airspeed,
RED - AoA is more than assigned, urgently increase the airspeed,
RED BLINKING - AoA is critically high, DANGER! Apply full afterburner, abort the approach and go around again!
Keeping the ADI steering and ILS bars centered and the green light on the ISM-1 will provide a precise final approach to the carrier.
HUDの左側にISM-1 AOA(迎え角)指示器があります。グライドスロープ上での指定されたAOAからのズレを表示します。これはグライドパス上で指定された速度を維持するのに非常に役立ちます。
黄色の点滅 :AOAが危険なまでに小さい。速度を落とせ。
黄色 :AOAが小さい。速度を少し落とせ。
黄色+緑色 :AOAが指定より多少小さい。速度を調整せよ。
緑色 :AOAは正常。現在の速度を維持せよ。
赤+緑色 :AOAが指定より多少大きい。速度を上げよ。
赤 :AOAが指定より大きい。急いで速度を上げよ。
赤の点滅 :AOAが危機的に大きい。危険!フル・アフターバーナーにして、アプローチを中止し周回をやり直せ。
ADIのフライトディレクターとILSバーを中心に維持し、ISM-1のライトを緑色に保てば、空母への正確な最終アプローチが可能になります。
If there is glidepath error or too much airspeed when the fighter descends to 50m - abort the approach and go around again.
機体が50mまで降下した時に、グライドパスとの誤差があったり対気速度が大き過ぎる場合は、アプローチを中止し再び周回します。
Just before touchdown, we fly visually to the arrestor cables. Just before the moment of touchdown, we apply full afterburner.
タッチダウンの直前になったら、制動ケーブルに向かって目視飛行します。タッチダウンの一瞬前に、フル・アフターバーナーにします。
Got the cable! Power to idle...
ケーブルを捕らえました!出力をアイドルにします・・・。
We retract the flaps ('Ctrl-F'), airbrake ('B') and arrestor hook ('Ctrl-G'), fold the wings ('Ctrl-P'), and taxi to the 1st starting position.
フラップ(「Ctrl F」)とエアブレーキ(「B」)、制動フック(「Alt G」)を格納し、主翼を折り畳み(「Ctrl P」)第一発艦位置にタキシングします。
If we missed the arrestor cable (i.e. the plane doesn't jolt) - then we keep full afterburner, retract the airbrake and go around for a second approach. We go to full afterburner just before touchdown to provide as much speed as possible in case of this emergency.
制動ケーブルを捕らえられなかった場合(つまり機体が急減速しない時)は、フル・アフターバーナーを維持し、エアブレーキを格納し2度目のアプローチに向けて周回します。タッチダウンの直前にフル・アフターバーナーにするのは、こうした非常事態の時に可能な限り大きな速度を得るためです。
We stop the fighter at the starting position.
機体を発艦位置に停止させます。
The 'U' key sets us up for another launch.
「U」キーで次の発艦ができる状態にします。
'Ctrl-P' unfolds the wings.
「Ctrl P」で主翼を拡げます。
You may now practice basic carrier operations. Take control now by pressing 'Ctrl-Q', or exit by pressing 'Esc'.
空母での基礎運用の訓練をしてみて下さい。「Ctrl Q」を押して操縦を引き継ぐか、「ESC」を押して終了して下さい。
<以上>