Su-25:導入と航法
Comrade, welcome to your formal training in the Sukhoi Su-25 Frogfoot! The Su-25 Frogfoot is a small very tough and heavily armoured ground attack aircraft specializing in Combat Air Support(CAS) missions with bombs, rockets, and guided tactical air to ground missiles.
同志よ、スホーイSu-25フロッグフットの公式訓練にようこそ! Su-25フロッグフットは小型堅牢で重武装の地上攻撃機で、爆弾やロケット、戦術空対地誘導ミサイルを用いた戦闘航空支援(CAS)ミッションに特化されています。
The Su-25 is powered by two Tumansky R-195 turbojet engines each rated at 4,500 Kg of thrust and is capable of reaching 970 km/h at sea level, a maximum of Mach .80 with a maximum range of 1250 kilometers, and has a ceiling of 7,000 meters.
Su-25は2基のTumansky社製R-195ターボジェットエンジンを装備しています。推力は1基当たり4,500kgで、海面高度での最高速970km/h、最大マッハ0.80で行動半径1250km、上昇限度7,000メートルの能力があります。
The Su-25 uses conventional hydraulically boosted flight controls and although it's not pretty to look at, it is a fast, highly maneuverable, and dependable air to ground weapons platform.
Su-25は従来型の油圧操縦装置を使用しています。見た目は良くないですが、速度が速く機動性の高い機体で、頼りがいのある空対地兵器発射母機となっています。
To take control at anytime press the 'CTRL-Q' keys or to exit this mission press the 'ESC' key and to pause at anytime to read the text press the 'S' key.
「Ctrl Q」キーを押せば、いつでも操縦を引き継げます。ミッションを終了するには「ESC」キーを、一時停止してテキストを読むには「S」キーを押します。
In this flight you will learn about the instrument panel and how to navigate using only the gauges on the panel. You will learn about the weapons sighting glass once we move to the combat training missions.
この飛行では計器盤とその計器だけを使って行う航法を学びます。兵器照準ガラスに関しては戦闘訓練ミッションに移ってから学びます。
Now we will move down to the main instrument panel. We will start with the 5 basic flight instruments. The first is the ADI or Attitude Direction Indicator which is the primary instrument of the 5.
さて視線を下げて主計器盤を見ていきましょう。5つの基本飛行計器から始めます。最初はADI姿勢指示器で5つの中で一番大事なものです。
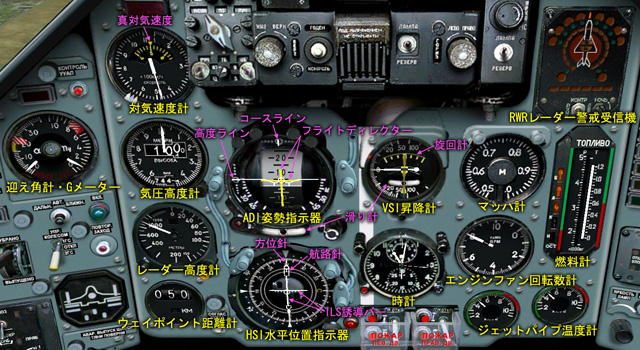
It is an artificial horizon which displays the aircraft's pitch and bank attitudes. Pitch is shown by a scrolling pitch scale and bank attitude is shown by a small aircraft symbol that banks as the aircraft banks. The pitch scale is displayed in 5 degree increments with grey showing a climb and black showing a descent.
人工水平儀があり、機体のピッチとバンク姿勢を表示します。ピッチは回転するピッチ目盛りで示され、バンク姿勢は小さな機体のシンボルマークが実際の機体のバンクに合わせて傾くことで示されます。ピッチ目盛りは5度刻みになっていてグレー部分は上昇を黒い部分は降下を表します。
The bank scale is graduated in 5 degree increments to 30 degrees then 15 degree increments to 60 degrees of bank. Integrated into the ADI is a flight director that will provide precise guidance in course, and altitude to the programmed waypoint. The yellow horizontal line is the required pitch line and the yellow vertical line is the required bank line.
バンク目盛りは30度までが5度刻みで60度までが15度刻みです。ADI に内蔵されているのはフライトディレクターで、プログラムされたウェイポイントに向かうコースと高度への正確な誘導を可能にします。黄色の水平の線は目標のピッチラインで、黄色の縦線は目標のバンクラインです。
The small white tick mark on the top of the ADI is the required course line and the tic mark on the left side is the required altitude line. Keeping the yellow bars crossed and each tic mark in the center will put on you the exact course at the proper altitude. It is important to remember that the pitch scale does not rotate like western ADI's and the aircraft symbol mimics your own wings.
ADI上部の小さな白線マークは目標のコースラインで、左側の白線マークは目標の高度ラインです。黄色いバーが交差し2つの白線マークが中央になるように維持すれば正確なコース上で適切な高度になります。西側機体のADIと違ってピッチ計は傾き方向には回転せず機体のシンボルマークが実際の機体の傾きを再現する、ということを忘れないで下さい。
Next is the HSI or horizontal situation Indicator which shows a horizontal, top-down view of the aircraft superimposed on a compass. The compass rotates so that the aircraft heading always appears at the top of the display.
次はHSI水平位置指示器で、真上から見た水平の機体が方位磁石の上に重ねられていると考えて下さい。方位磁石が回転し常に機体の針路が計器の真上を向くようになっています。
On the compass ring are 2 needles, the long, narrow bearing needle with the circle at the head which always points in the direction of the selected waypoint, and the short, wide needle that is always oriented to the required course to the waypoint.
方位磁石のリング上には2本の針があります。長くて細い先端に丸が付いた方位針は常に選択しているウェイポイントの方位を指します。短く幅広の針(航路針)は常にウェイポイントへの所要コースの向きになっています。(訳注:ここでの「コース」とは通過したウェイポイントと次のウェイポイントを結ぶ直線航路です。)
Displayed in the center of the HSI are the ILS localizer and glideslope guidance bars which are used when conducting an instrument landing.
HSIの中央に表示されているのはILSローカライザーとグライドスロープの誘導バーで、計器着陸を実行する時に使用します。
To the Left of the HSI is the waypoint distance gauge and displays the distance to the selected waypoint in kilometers.
HSIの左はウェイポイント距離計で、選択中のウェイポイントへの距離をキロメートル単位で表示します。
Next is the airspeed indicator which shows indicated airspeed. This gauge has a fixed airspeed scale, graduated from 100 to 1100 km with a pointing needle on the outside and a yellow scrolling number readout in the center graduated in 10 km/h increments. Add the 2 to get your total airspeed.
次は対気速度計で、外側には100km/hから1100km/hまでの固定された文字盤と動く針があり指示対気速度を示します。内側の黄色い回転する文字盤は真対気速度を示します(訳注:原文の誤りを修正しました。)
Below it is the barometric altimeter which displays the aircraft's altitude above mean sea level at all times with an outer scale and needle indicating altitude in 10m increments to 100m and an inner barrel scale indicating total altitude in numerical format.
その下は気圧高度計で、常に機体の海抜高度を表示します。外側の文字盤と針は10m刻みで1000mまでの高度を示し、内側の樽型文字盤は全高度を数値表示します。(訳注:外側は高度の下3桁だけを示します。)
The last of the 5 is the Variometer which indicates the aircraft's current rate of climb and rate of turn. The scale of the instrument ranges from a maximum climb of 200 meters/second to a dive of 200 meters/second.
5つの基本計器の最後は昇降計で現在の機体の昇降率と旋回率を表示します。目盛りの範囲は最大毎秒200メートルの上昇から毎秒200メートルの降下までです。
The turn rate scale ranges from 1 to 3 degrees/second to the left and right. The black ball in the glass liquid filled casing is the slip indicator and is used to coordinate turns. You would 'Step on the ball' or apply rudder to the side the ball is on to center it.
旋回計は左右毎秒1〜3度の範囲で示されます。液体が満たされたガラス容器の中の黒いボールは滑り計で旋回を調整するために使用します。「ボールを蹴る」ようにボールがある側のラダーを踏み込めばボールが中央に向けて動きます。
To the right of the Variometer is the MACH meter gauge and indicates the aircraft's Mach number ranging from .50 to 1.0.
昇降計の右はマッハ計で機体のマッハ数を0.5から1.0の範囲で示します。
Additional instruments are the combined Angle of Attack/G meter which displays angle of attack(AoA) on the left side and instantaneous positive and negative G-loads on the right. The AoA range is from zero to 40 degrees with the red mark indicating maximum operational angle of attack.
補助的な計器として迎え角とGメーターの複合計器があり、左側は迎え角(AoA)を示し、右側はプラスまたはマイナスの瞬間的なG加重を示します。AoAはゼロから40度までの範囲で示され、赤い印は最大運用迎え角を表します。
The G meter scale indicates from 0 to positive 10 G's with a red line of 6.4 G's.
Gメーターは0からプラス10Gまでを示し、赤い線は6.4Gを示します。
Below the Altimeter indicator is the radar altimeter or 'RADALT' which displays the aircraft's altitude above ground ranging from zero to 1500 meters.
気圧高度計の下はレーダー高度計「RADALT」で、地表からの機体高度をゼロから1500メートルまで表示します。
Next, below the Mach meter is the dual needle engine N2 fan RPM gauge which indicates the engine speed as a percentage of maximum RPM for both the left and right engines with '10' indicating 100% military thrust.
次は、マッハ計の下の2本の針のあるエンジンN2ファンRPM(回転数)計で、左右のエンジン回転速度を最大RPMに対するパーセントで表示します。数値「10」は100%のミリタリー推力を表します。
To the left of the N2 RPM gauge is the clock. The built in timer can be started and reset to zero by pressing the 'ALT-C' keys.
N2回転数計の左は時計です。内蔵されたタイマーは「Alt C」キーを押すことでスタートとリセットができます。
Below the RPM gauge are the two jet pipe temperature gauges which indicate the temperature of the gases at the turbine exhaust. The scale reads Celsius in 100 degrees increments up to 1000 degrees.
回転数計の下は2つのジェットパイプ温度計で、タービン排気部分でのガスの温度を示します。100度刻みで1000度までの摂氏温度が示されます。
To the right of the Mach meter is the Fuel gauge which shows the remaining fuel measured in 200 KG increments to 1,200 KG on the right side and in 1000 Kg increments to 5000 KG total on the left side of the gauge.
マッハ計の右は燃料計です。計器の右側は1,200kgまでを200kg刻みで、左側は5000kgまでを1000kg刻みで残燃料の量を示します。(訳注:白線が残燃料です。)
Finally, above the fuel gauge is the Radar Warning Receiver(RWR) which is explained later in your training.
最後は、燃料計の上のRWRレーダー警戒受信機で、今後の訓練で説明されます。
Now that we know how to interpret data from the instrument panel it's time to use it to navigate a series of waypoints. There are 3 navigation modes in the Frogfoot and they are cycled by pressing the '1' key.
計器盤のデータの読み方を知ったので、その知識を複数のウェイポイントへ機体を誘導するのに使ってみましょう。フロッグフットには3つの航法モードがあり、「1」キーを押すことで切り替えができます。
The first sub-mode is the Enroute mode, which we are in now, and this the primary navigation mode you will use when following a flight plan. You can cycle the waypoints with the '~TILDE' key.
最初のサブモードは航路モードで、現在そのモードになっています。このモードが主要な航法モードでフライトプランに沿って飛行するために使用します。ウェイポイントは「~」キーで切り替えができます。(訳注:「~」キーは日本語キーボードでは入力できません。)
The second sub-mode is the Return mode which will automatically select the initial approach fix or IAF of the airport you have designated to land at in your flight plan. You can cycle the IAF of all the airports with the '~TILDE' key.
2つ目のサブモードは帰還モードで、フライトプランで着陸指定した飛行場のIAF初期進入フィックスを自動的にウェイポイントとして選びます。「~」キーで全ての飛行場のIAFに切り替えができます。
The final NAV mode is the ILS mode which will automatically select the final approach fix or FAF of the airport you have designated to land at in your flight plan, as well the FAF's of all the airports can be cycled with the '~TILDE' key.
最後の航法モードはILSモードで、フライトプランで着陸指定した飛行場のFAF最終進入フィックスを自動的に選びます。FAFの時と同じように「~」キーで全ての飛行場に対する切り替えができます。
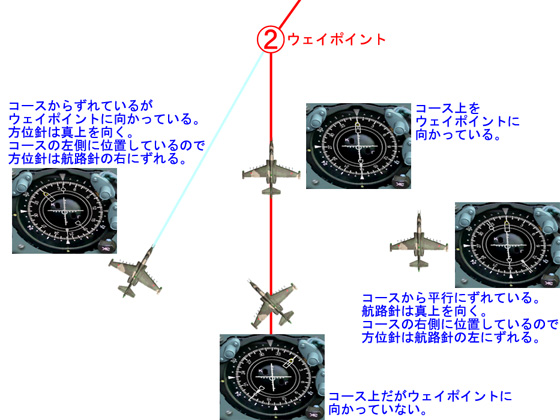
We are currently heading for waypoint 1 level at 1000 meters, when we reach it the computer will automatically select waypoint 2.
現在高度1000メートルの水平飛行でウェイポイント1に向かっています。ウェインポイント1に到達すると自動的にウェイポイント2が選択されます。
There is the switch to waypoint 2 and notice the bearing needle is now pointing to the right at waypoint 2 and the course needle is also pointing right set for the required course of '334'.
ウェイポイント2への切り替えがありました。方位針がウェイポイント2のある右側を指し、航路針も同じく右を指し所要コース「334」を示しています。
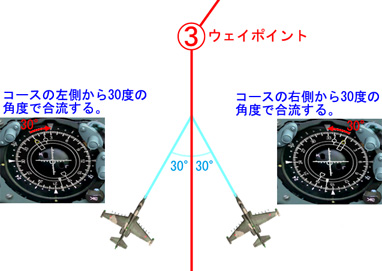
We'll use a 30 degree intercept and we chose the intercept heading by either adding or subtracting 30 degrees from the course. In this case the bearing needle is pointing to the right of the course needle which means we are left of track so we'll add 30 degrees which gives us a heading of 004. If the bearing needle was pointing left of the course needle we would subtract the intercept angle.
30度の角度でコースに交差し合流するつもりなので、コースの方位から30度を足すか引くかした合流方位を選びます。今の場合、方位針が航路針の右側を指していて機体が正規コースから左にずれている事を示しているので、30度を足して方位004となります。もしも方位針が航路針の左側を指していたら合流角度を引きます。(訳注:航路針に対し方位針よりも離れた方位に飛行しないとウェイポイントに着くまでにコースに合流することはできません。)
Now we can monitor 3 instruments, the ADI flight director, the HSI by waiting for the bearing needle to align with the course needle, and the waypoint distance gauge.
3つの計器を監視します。ADIのフライトディレクターとHSI、ウェイポイント距離計です。HSI上で方位針が航路針と一致するのを待ちます。
It is important to not exceed 30 degrees of bank when flying in cloud during instrument conditions.
雲の中で計器飛行をしている時はバンクが30度を超えないようにするのが重要です。
We just intercepted the course and have a descent indication on the flight director so we'll begin descending to 500 meters.
コースに合流しましたが、フライトディレクターが降下を示しているので高度500メートルへの降下を始めます。
Now we're on course and at altitude heading for waypoint 2. I will select waypoint 3 early.
ウェイポイント2に向かう適正なコースと高度に乗っています。早目にウェイポイント3を選びます。
There, the course and the bearing pointer are pointing left, indicating a course of '270' and already are closely aligned so I'll just turn to the course heading, roll into the intercept and start climbing to 4000 meters.
すると、航路針と方位針が左を指しています。航路針が「270」を示し方位針とあまり離れていないので、まずは方位針の方向に旋回し、ロールして合流し、高度4000メートルに向けて上昇を始めます。
You can see the two white tick marks center as we capture the course and altitude.
コースと高度を捉えるとADIの2つの白線マークが中央になるのが分かります。
Now we're on course and at altitude heading for waypoint 3. I will select waypoint 4 early and we'll intercept on our own.
現在ウェイポイント3に向かうコースと高度に乗っています。早目にウェイポイント4を選び自力で合流します。
This time we'll use a 45 degree intercept so since the course is 001 subtract the intercept angle of 45 which equals 316 so we'll turn to a heading of 316 and wait for the bearing needle to align with the course needle, intercpet, and we'll be on course.
今回は45度の角度で合流します。コースの方位が001ですから合流角度45度を引くと316度になります。方位316に旋回し方位針が航路針と一致するのを待って合流すればコース上に乗ります。
To fully understand the Frogfoot's cockpit, please read the manual.
フロッグフットのコクピットを完全に理解するにはマニュアルを読んでください。
There, we are almost on course for waypoint 4.
ウェイポイント4へのコース上までもう少しです。
Upon reaching waypoint 4 the NAV computer will switch to the 'Return' mode and direct you to the IAF for a landing at Krymsk and now it's time for you to finish the flight on your own. Good luck! Press the 'CTRL-Q' keys to take control or the 'ESC' key to exit. You have control.
ウェイポイント4に到達すると航法コンピュータが「帰還」モードに切り替わりIAFに誘導されKrymsk飛行場に着陸できます。この飛行をあなた自身で完了させる番です。幸運を祈ります!「Ctrl Q」キーで操縦を引き継ぐか、「ESC」キーで終了してください。操縦を任せます。
<以上>