Su-25T:導入
Comrade, welcome to your formal training in the Sukhoi Su-25T Frogfoot! The Su-25T Frogfoot is a modification of the Su-25 well known ground attack plane.
同志よ、スホーイSu-25Tフロッグフットの公式訓練にようこそ!Su-25Tフロッグフットは有名な地上攻撃機Su-25の改良型です。
The Su-25T has the avionics typical of a common Russian fighter including a HUD and an autopilot. It has 2 additional fuel tanks.It became heavier and got a hump behind the canopy cowling the additional electronics.
Su-25Tは、HUDやオートパイロットを含めてロシア戦闘機共通の典型的なアビオニクスを使用しています。2つの燃料タンクが追加され、重量が増加し、追加された電子機器を収めるためにキャノピーの後ろが盛り上がっています。(訳注:エンジンの推力はSu-25と変わらないので、機動性はSu-25より劣ります。)
The Su-25T uses conventional hydraulically boosted ailerons and elevator whereas the Su-25 has only ailerons boosted.
Su-25Tは従来型の油圧動力式のエルロンとエレベータを使用しています。Su-25ではエルロンだけが油圧動力式でした。
To take control at anytime press the 'CTRL-Q' keys or to exit this mission press the 'ESC' key and to pause at anytime to read the text press the 'S' key.
操縦を引き継ぐには「Ctrl Q」キーを、ミッションを終了するには「ESC」キーを、一時停止して文章を読むには「S」キーを押します。
In this flight you will learn about the HUD indications and how to navigate using a steering circle also known as a flight director. You will also learn about the autopilot modes except the combat ones. It's highly recommended that you have flown the training flight in Su-25 before.
この飛行でHUD表示とステアリングサークルを使った航法を学びます。ステアリングサークルはフライトディレクターとも呼ばれます。また戦闘用以外のオートパイロットモードについても学びます。この訓練の前にSu-25用の訓練をこなしておくと良いでしょう。
The main instrument panel is almost the same as the one in the Su-25. At the left bottom of it there is the autopilot control panel.We will return to it later.
主計器盤はSu-25のものとほぼ同じです。左下にオートパイロット制御パネルがあります。これに関しては後で見ていきます。
Look at the HUD. Before we begin the NAV and ILS training we will first learn the information that the Head Up Display or HUD provides us.
HUDを見て下さい。NAV(航法)やILSに関して訓練する前に、HUDヘッドアップディスプレイが示す情報に関して学びます。
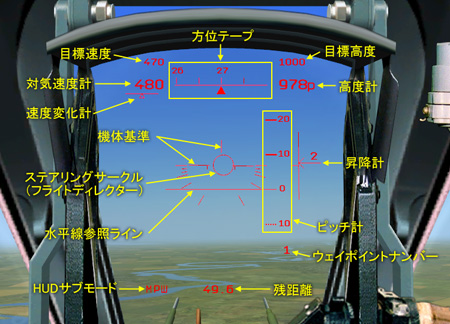
In the center of the HUD is the aircraft datum and the horizon reference line which is a duplicate of the attitude indication gauge on the main panel. The aircraft datum is a miniature aircraft and we must visualize that we are looking at it from directly behind it.
HUDの中央には機体基準と水平線参照ラインがあり、主計器盤の姿勢指示計と同じ情報を示します。機体基準はミニチュアの機体で、それを真後ろから見ているものと解釈して下さい。
As the aircraft rolls and banks the datum will also roll and bank in unison which shows us what bank attitude we are in even if we can't see the ground or the outside horizon, as well, it will go completely inverted if the aircraft is inverted.
機体がロールして傾くと機体基準も同期してロールし傾き、地上や水平線が見えなくても機体のバンク姿勢を示してくれます。そして、機体が反転すれば機体基準も完全に逆さまになります。
Below the horizon line are angled lines that show from wings level through increasing bank angles of 0, 5, 10, 15, 30, and 60 degrees. The datum remains stationary and the horizon line will rise above or below it as the aircraft's nose rises above or below the true horizon.
水平線ラインの下に角度の付いた線が何本かあり、水平から始まってバンク角0、5、10、15、30、60度を示します。機体の機首が水平線より上や下を向いた場合は、機体基準はそのままで水平線ラインが上下に動きます。
There is also a numerical pitch indicator to the right side of the horizon line that will show how many degrees of pitch the nose is above or below the horizon with a negative number representing a negative pitch or nose low attitude.Next to it there is a variometer scale that indicates rate of climb or descent in m/s.
水平線ラインの右側に数値表示のピッチ計もあり、機首が水平線に対しどれだけ上下しているかをピッチ角度で示します。マイナスの数値はマイナスピッチつまり機首下げ姿勢を表します。その隣りには昇降計があり、上昇または降下率をm/sで示します。
In the upper left corner of the HUD is the airspeed readout which is displayed in kilometers per hour and gives us our aircraft's airspeed.The line and the triangle below is the acceleration/deceleration indicator. The readout above in NAV mode is a prescribed speed.
HUDの左上の角には対気速度計があり、時速キロメートルで機体速度を示します。その下の線と三角マークは速度変化計です。NAV(航法)モードでは対気速度の上に目標速度が表示されます。
To the right of the airspeed readout is the heading tape which displays the aircraft's magnetic heading as a scrolling tape with the solid triangle indicating the current heading.
対気速度計の右は方位テープで、回転するテープと現在の方位を指す三角マークによって機体の磁方位を示します。
Continuing to the right is the altitude readout which displays the aircraft's altitude above sea level, or barometric altitude. When the radar altidude is available it is indicated instead of barometrical.The readout above indicates the prescribed altitude.
さらに右には機体の海抜高度つまり気圧高度を示す高度計があります。レーダー高度計が使用可能な場合は気圧高度の代わってレーダー高度(対地高度)が示されます。その上の数値は目標高度を示します。(訳注:対地高度が1500m以下の場合、レーダー高度になります。レーダー高度の場合は数値の右に「p」が表示されます。)
On the bottom left is the HUD main mode and the bottom right in the NAV mode is the waypoint number indication.The HUD modes and submodes are almost the same as for ASP-17 gunsight in Su-25. The number to the right of the HUD mode indicator is the distance to the next waypoint.
左下はHUDサブモードで、「航路」サブモードの場合はウェイポイントナンバーが右下に表示されます。HUDサブモード表示の右の数値は次のウェイポイントまでの距離を示します。(訳注:サブモード表示の英語表記は「ENR」、ロシア語表記は「МРШ」です。また、原文の誤りを修正しました。)
The steering circle in the center is the flight director showing us the way to steer to. Using the steering circle alone we can fly the aircraft in control without any outside visual references. The steering circle guides us when we, for example, intercept the course so it's not necessary to calculate anything - just follow the White Rabbit.
中央のステアリングサークルは操縦すべき方向を示すフライトディレクターです。ステアリングサークルだけを使って外部の視界情報に頼らずに機体をコントロールし飛行させる事ができます。ステアリングサークルは、例えばいつコースに合流すれば良いかを教えてくれますから、余計な計算は要りません。ただ「白ウサギを追いかけて」いれば良いのです。
The autopilot can follow it better than the human pilot if you select the main and the most complicated mode 'Enroute' pressing 'A' key. I will show how the autopilot steers the plane to the route.
「A」キーを押して主要かつ最も複雑なオートパイロットモードである「航路」を選べば、人間のパイロットよりも上手にステアリングサークルに追従する事ができます。。オートパイロットがルートに向けていかに機体を操作するかをお見せしましょう。(訳注:「A」キーの代わりに「Alt 6」も使えます。)
I'll turn away from the route and then press the 'A' key. Using the autopilot you have to monitor your speed and control the thrust to maintain it. The autopilot has some limitations: AoA (gauge)<15 degree and G<3.
ルートから離れて、しばらくしたら「A」キーを押します。オートパイロットを使う場合は機体の速度を監視し、速度を保つために推力をコントロールしなければなりません。オートパイロットは幾つかの制限があります。迎え角(計測値)15度以下、G加重3以下です。(訳注:速度が低過ぎると迎え角が制限一杯になりオートパイロットが正常に働かなくなります。その場合は推力を上げます。オートパイロットの動作がおかしい場合は迎え角と速度を確認しましょう。)
While we are turning it's time to learn about the autopilot modes. The first is 'Enroute' that is available in ENROUTE sub-mode while in NAV mode.It automatically steers the plane via the waypoints set in the mission editor so you only have to maintain the required speed.
旋回している間にオートパイロットのモードに関して学びましょう。まず最初は「航路」モードで、NAV(航法)モードのENR「航路」サブモードの場合に使用可能です。ミッションエディタで設定したウェイポイントを通るように自動的に機体が操作されますから、あなたは必要な速度を保つようにするだけです。
The second is the 'Landing' mode. You can switch it ON pressing 'A' key while in LANDING submode or if autopilot is already on in ENROUTE sub-mode it switches to this mode automatically when the start point of final approach is passed.
次は「着陸」モードです。LNDG「着陸」サブモードの時に「A」キーを押せば作動させる事ができます。あるいは既にオートパイロットが「航路」サブモードで作動していれば、最終アプローチ開始点を通過した時に自動的にこのモードに切り替わります。
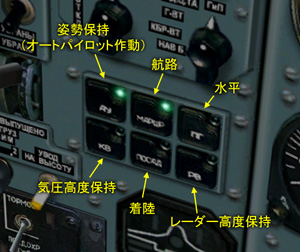
The 'Angles hold' mode ('Alt-1'). Stabilizes the pitch and the bank. The mode is very useful to perform climbing or descending turns or simply to climb and descent without bank.
「姿勢保持」モード(Alt 1)はピッチとバンクを安定化します。このモードは上昇旋回または降下旋回、あるいはバンク無しの単純な上昇や降下を行なう場合にとても便利です。
The 'Baro altitude and bank hold' mode ('Alt-2') is useful to perform level turns up to 45 degree bank.
「気圧高度とバンク保持」モード(Alt 2)はバンク45度までの水平旋回をする時に便利です。
The 'Level' mode ('Alt-3') levels the plane from any attitude. Always remember that autopilot can pull only 3 g... but you always can help it pulling the stick.
「水平」モード(Alt 3)はどんな姿勢からでも機体を水平にします。ただしオートパイロットは最大3Gまでしか加重をかけない事を忘れないでください。ですが手動で操縦桿を引けば補助することもできます。(訳注:「水平」モードは、「緊急水平」モードや「パニックボタン」とも呼ばれます。)
The 'Baro altitude hold' ('Alt-4') mode helps to maintain horizontal flight but you can control the bank.
「気圧高度保持」モード(Alt 4)は水平飛行を維持しつつバンクをコントロールする場合に便利です。(訳注:「Alt 4」の代わりに「H」キーも使えます。)
The 'Radar altitude hold' ('Alt-5') mode helps to fly keeping the radar altitude constant. Good business while flying in the Caucasus mountains. Try it in your next flight.
「レーダー高度保持」モード(Alt 5)はレーダー高度を一定に保ちながら飛行するのに適しています。コーカサス山脈の中を飛行する時は頼りになるでしょう。次に自分で飛ぶ時に試してみて下さい。
The autopilot switches off if the pitch exceeds +-35 degrees or the bank exceeds 60 degrees except the 'Level', 'Enroute' and 'Landing' modes.
「水平」、「航路」、「着陸」モード以外では、ピッチが±35度を超えるかバンクが60度を超えるとオートパイロットは解除されます。
Now let's take a look at how the autopilote returns us to the route. I press 'A' key... and check the control panel. Now don't forget to monitor the speed.
それではオートパイロットがどんな風に機体をルートに戻すか見てみましょう。「A」キーを押して・・・制御パネルを確認します。速度を監視する事を忘れないで下さい。
Good job! You can have a coffee break. But we'd better try the 'Angles hold' mode. Let's begin 30 deg pitch up turn.
うまくいきました!休憩してもいいですが、「姿勢保持」モードを試してみましょう。ピッチ30度上げの旋回をしてみます。
By pressing and hold the 'Alt-~' key you can switch autopilot off, set new flight parameters then release the key. It's a good idea to assign a joystick button for this function.
「Alt ~」を押している間はオートパイロットを解除する事ができますから、新しい飛行条件を設定し、その後キーを離します。この機能はジョイスティックのボタンに割り当てておくと良いでしょう。(訳注:「Alt ~」キーは日本語キーボードでは入力できません。)
And now the autopilot holds the new parameters.
オートパイロットが新しい飛行条件を覚えました。
Now I switch the autopilot to 'Level' mode and then - to 'Enroute'.
さて、ここでオートパイロットを、まず「水平」モードに、次に「航路」モードに切り替えます。
The waipoint 1 was passed and now the autopilot is steering to the next waipoint. Note how it intercepts the course.
ウェイポイント1を通過したのでオートパイロットは次のウェイポイントに向けて操舵しています。どのようにコースに合流するか見ていて下さい。
I have to extend the airbrakes to avoid overspeed.
オーバースピード(速度超過)を防ぐためエアブレーキを開きます。
It intercepts the course at a 90 degrees angle!
90度の角度でコースに合流します!
Excellent! Before we reach the waypoint #2 I switch off the autopilot and select the waypoint #3. Then I try to intercept the course 'following the White Rabbit'.
上出来です!ウェイポイント2に着く前にオートパイロットを切りウェイポイント3を選ぶつもりです。その後私が操縦して「白ウサギを追いかけて」コースに合流してみます。
While we are flying to the next turning point we have time to learn more about the autopilot.
次の旋回ポイントに向けて飛行している間に、オートパイロットに関してより詳しく学びます。
The 'Baro altitude hold', 'Radar altitude hold' and 'Angles hold' modes can be switched on directly from the 'Enroute' or 'Landing' modes. The autopilot holds the current flight parameters at the moment of switching on.
「気圧高度保持」、「レーダー高度保持」、「姿勢保持」の各モードは、「航路」と「着陸」モードと同時に作動させる事ができます。オートパイロットは作動した瞬間の飛行条件を保持します。(訳注:コース上を飛行したいが高度を自分でコントロールしたい場合に使うと良いでしょう。)
Autopilot can draw the plane away from the dangerous altitude while in the 'Radar altitude hold', 'Baro altitude hold', 'Angles hold' modes even if they are switched on in the 'Enroute' or 'Landing' modes. It automatically starts to draw away if, subject to the vertical speed, the current altitude becomes less than 0.5 of the preset value or if the vertical speed exceeds -50 m/s.
「レーダー高度保持」や「気圧高度保持」、「姿勢保持」モードの場合、たとえ「航路」や「着陸」モードと同時に作動しても、オートパイロットは危険な高度から機体を引き戻してくれます。昇降速度に従って、現在の対地高度がプリセット値の半分以下になるか昇降速度が-50m/sを超えた場合、自動的に引き起こしを開始するからです。
The autopilot makes the flight nice and easy... if you don't forget to monitor your speed.
オートパイロットが飛行を快適で易しいものにしてくれます・・・速度の監視を忘れなければですが。
Definitely, I am not so good as the autopilot...
どう見ても、私よりオートパイロットの方が操縦がうまいですね・・・。
When you fly this mission next time you can pass the whole route but now I'll RTB.
あなたがもう一度このミッションを飛行する時にはすべてのルートを辿ってもいいですが、今回はここで飛行場に帰ります。
I will switch to RETURN submode pressing '1' key and then I'll switch the autopilot on.
「1」キーを押してRTN「帰還」サブモードに切り替えてからオートパイロットに切り替えます。(訳注:HUDサブモード表示の英語表記は「RTN」、ロシア語表記は「ВЗВ」です。
The autopilot now is in the 'Landing' mode and are steering the plane to the glidepath. Our task is to control the speed.
オートパイロットが「着陸」モードに切り替わり機体をグライドパスに乗せようとしています。我々の仕事は速度をコントロールする事です。(訳注:HUDサブモード表示の英語表記は「LNDG」、ロシア語表記は「ПОС」です。
OK, I take control to complete the final approach.
OK、手動操縦に切り替え最終アプローチを完了させます。(訳注:オートパイロットのまま着陸はできません。対地高度50mで自動的に解除されるからです。よほど視界が悪くない限り対地高度100〜200mで手動に切り替えると良いでしょう。)
To fully understand the Su-25T Frogfoot's cockpit innovations, please read the manual.
革新的なSu-25Tフロッグフットのコクピットを詳しく理解するにはマニュアルを読んで下さい。(訳注:オートパイロットはトリムを使うので、中途半端な姿勢の時にオートパイロットを解除すると偏ったトリムのままになり操縦が困難になる場合があります。Su-25Tではワンタッチでトリムリセットができないので、急いでトリムを中立方向に動かすか、一旦「水平」モードにして機体が安定するのを待って再び解除すると良いでしょう。)
<以上>